Saturday, June 14, 2008

Blog Widget - Part 3

This is the third in a series of articles about the Blog Widget, the most important widget in Blogger. First article was an overview of the widget and the second was about the status-message section.

In this part, we are going to take a look at the comments section.

If you open your template in HTML mode (i.e. Layout -> Edit HTML) and click on the Expand Widget Templates button, you can see the following code that encloses the comments section.

<b:includable id='comments' var='post'>
...
</b:includable>

Everything about how to display the comments in a given post is described within the above includable section. This section is then included inside the main section as shown in red below.

<b:includable id='main' var='top'>
<!-- posts -->
<div class='blog-posts hfeed'>

<b:include data='top' name='status-message'/>

<data:adStart/>
<b:loop values='data:posts' var='post'>
<b:if cond='data:post.dateHeader'>
<h2 class='date-header'><data:post.dateHeader/></h2>
</b:if>
<b:include data='post' name='post'/>
<b:if cond='data:blog.pageType == "item"'>
<b:include data='post' name='comments'/>
</b:if>

...
</b:includable>

Notice that the comments section is enclosed in a <b:if> element. What it says is to show the comments section only if the pageType is equal to item. This is why we don’t see the comments in the blog’s homepage or archive pages. The default setup is to show comments only in the individual post pages.

Now let’s get to the internals of the comments section. Before looking at the code, see the following illustration to understand the sub sections of the comments section.
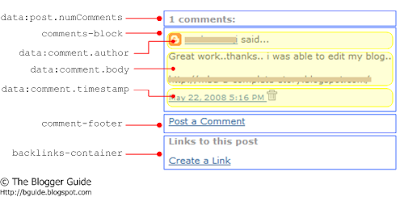

The above figure has the regions of a screenshot of an actual comments section marked out, helping you to make the connections easily. As you can see, right on top is the numComments sub section showing the number of comments.

Next is the comments-block, which in turn is divided in to 3 parts; comment author, comment body and timestamp. The light yellow shading in the above figure highlights these 3 sub sections. The names of these 3 sub sections are self explanatory. comment-block section repeats the author, body and timestamp sub sections for every comment in a given post.

An important thing to note inside the timestamp sub section is the commentDeleteIcon, shown in red below. (This is one of the includables we discussed in part 1 of this series.).

<span class='comment-timestamp'>
<a expr:href='data:comment.url' title='comment permalink'>
<data:comment.timestamp/>
</a>
<b:include data='comment' name='commentDeleteIcon'/>
</span>

This is the small trash can icon you see next to the timestamp in the above figure and it is displayed only when the blog’s admin is logged in. We will take a detail look at the commentDeleteIcon section later in this series.

Following the comments-block (i.e. after displaying all the comments) is the comment-footer which carries the Post a Comment link.

And finally is the back links section, which displays any other blog posts that link to the post in concern. The backlinks-container in turn includes the backlinks section, another includable of the Blog Widget.

That’s it. Hope you are now clear about the comments section of the Blog Widget. Did I manage to explain the somewhat complex code in this part clear enough? Let me know what you think.

Note:
One sub section I didn’t mention is the paging-control-container, which will break the display of the comments, over several “pages”. This will come in to play once the number of comments reaches a particular maximum number per page. However, I was not able to figure out what that maximum is and none of my posts have reached a level where the comment paging has taken place. If you do know that maximum number of comments per page, let me know.

Thursday, June 12, 2008

CSS Selectors in Blogger Templates

The look and feel of Blogger templates are controlled by the Cascading Style Sheet (CSS) rules defined in the template skin. Currently, there are 38 different templates available from Blogger. These templates use a number of different CSS selectors or rules.

Some of these selectors are common to all the templates and some are specific to certain templates. Knowledge about which selectors are used by which templates is useful when trying to tweak the formats and styles of Blogger templates.

Here is a matrix showing the CSS selectors against the Blogger templates in which they are used. This can be used as a reference when you want to find out what CSS selectors can be used to modify the look and feel of your tempalte.

A screenshot of the first page of this matrix is given below.


Note:
This matrix has been generated by a program that processed all the templates. It's very difficult to check whether all the selectors are properly marked for all the templates. If you find any errors in the matrix, please let me know.

Thursday, June 5, 2008

URLs

Here are some common questions about URLs and adding hyperlinks in Blogger.

What is a URL?
URL stands for Uniform Resource Locator. It is a way of uniquely identifying the location of a resource (such as a web page, an image etc) on the vastly complex network of the Internet.

The key word here is “uniform” meaning uniqueness; i.e. a given URL should point to one and only one resource on the Internet. In other words, the same URL cannot point to (i.e. identify) more than one resource. Two URLs, however, can point to the same resource.

How do I represent a URL in HTML?
HTML uses the “anchor” element ( i.e. <a>…</a>) to define URLs. The word anchor gives the idea of linking. When an anchor element is used to refer to a URL, the resulting entity is usually referred to as a hyperlink.

The usual syntax of the anchor element is shown below.

<a href="url to link to">Link Text</a>
  • <a …> is the opening tag
  • href (or hyperlink reference) is an attribute which carries the URL of the page to link to as the attribute value
  • Link Text is the text that will be actually displayed on the browser
  • </a> is the closing tag, which marks the end of the anchor element
For example, when:

<a href="http://bguide.blogspot.com">The Blogger Guide</a>

is entered in to the HTML code of a web page, the following hyperlink will appear on that page.

The Blogger Guide

How do I open a link in a new tab/window?
Sometimes when you click on a hyperlink, the target page opens in a separate window or tab of the browser. (Whether it opens on a new tab or a window actually depends on the settings of the browser)

The way to achieve this is to add the attribute target with the value _blank inside the opening tag of the anchor element.

E.g.

<a href="url" target="_blank">Link Text</a>

How do I add a hyperlink in Blogger?
There are two ways in which you can add a hyperlink in Blogger.

One is to use the Compose (i.e. WYSIWIG) mode editor.
Steps:
  1. Highlight the text that should be linked
  2. Click on the Hyperlink icon
  3. Enter the URL to link to and click OK
See the figure below for an illustration of the above steps.


The other method is to directly type the HTML code in the Edit Html mode of the post editor as shown below.


Note:
If you want add the target="_blank" part, then you have to use the Edit Html mode and change the HTML code.

Wednesday, June 4, 2008

Blog Widget - Part 2

In the previous article of this series, we had an overview of the Blog widget covering its basic components. In that article, we learned the main includables and their order of inclusion.

In this article we will take a look at the status-message includable.

If you open your template in HTML mode (i.e. Layout -> Edit HTML) and click on the Expand Widget Templates button, you can see the following code that defines the status-message section.

<b:includable id='status-message'>
<b:if cond='data:navMessage'>
<div class='status-msg-wrap'>
<div class='status-msg-body'>
<data:navMessage/>
</div>
<div class='status-msg-border'>
<div class='status-msg-bg'>
<div class='status-msg-hidden'><data:navMessage/></div>
</div>
</div>
</div>
<div style='clear: both;'/>
</b:if>
</b:includable>

And this particular section will be included in the main section as follows.

<b:includable id='main' var='top'>
<!-- posts -->
<div class='blog-posts hfeed'>

<b:include data='top' name='status-message'/>

...
</b:includable>

This section, however, is not a very important part of the Blog widget. There are two instances in which this section comes in to play; when someone searches your blog using the Search box in the Navigation Bar or clicks on one of the Labels.

For example, if some searches for the string "text widget", the status message will be displayed as follows.


So that's the status-message section of the Blog widget.

Tuesday, June 3, 2008

Blog Widget - Part 1

The Blog Widget is the most important widget in Blogger. It contains the core content of a blog including its posts, comments, back links and feed links. In other words, this is what defines the composition of the main column of a Blogger blog.

Knowing the finer points of the Blog widget is very valuable to any Blogger user. Since it is so important, I'm going to explain this widget over several articles. This is the first part of a multi part article series on the Blog widget.

As with any widget, the Blog widget also has a primary <b:includable> section with an id='main'. However, it also contains a number of other <b:includable> sections, each serving a valuable purpose. They are:

  • status-message
  • post
  • postQuickEdit
  • comments
  • commentDeleteIcon
  • backlinks
  • backlinkDeleteIcon
  • nextprev
  • feedLinks
  • feedLinksBody
These includables are the building blocks of the Blog widget. If we equate the Blog widget to a car, think of the main includable as the chassis and the others as various components such as the body, engine, seats etc. of that car. The final Blog widget is the result of assembling these includables in a particular order. This hierarchy of assembly is illustrated in the figure below.


At the first level of inclusions in the main section are the status-message, post, comments (only in item pages), nextprev and feedLinks sections. The post section in turn includes the postQuickEdit section. commentDeleteIcon and backlinks sections are contained within the comments section and the backlinks section in turn includes the backlinkDeleteIcon section. Finally, the feedLinks contains the feedLinksBody section.

In the articles to follow, we will probe each of these includable sections one by one.

Sunday, June 1, 2008

Widget Instantiation

The template is a crucial element of the new Layout Blogger blogs. It defines the arrangement of the main post column and the sidebar, layout of blog elements such as the posts, widgets, headers etc. and also the fonts and colors of its look and feel. Understanding the template is, therefore, very useful in understanding how your blog behaves.

In two previous articles we looked at the primary components and the basic skeleton of a Blogger template. In this article, we will dig in to the more specific topic of widgets. More precisely, we are going to see how widgets get instantiated.

Instantiation has a very specific meaning in a technical context. In programmers' jargon, it means creating a specific instance from a generic template. In laymen terms, think of a template as a mould and instantiation as the act of moulding out a shape from that mould. So, the widget we see in the template is the mould and when the blog is actually viewed in a browser window, what we see is the moulded shape (or the instantiated widget).

Let's look at an example to be more clear about this instantiation process.

Consider a simple Text widget with a title and some sample text in its body. If you go to Layout -> Edit HTML, all you see as your widget is a single line similar to the one shown below.

<b:widget id='Text1' locked='false' title='Test Widget' type='Text'/>

If you click on the Expand Widget Templates check box, the above single line will be expanded to the complete widget shown below.

<b:widget id='Text1' locked='false' title='Test Widget' type='Text'>
<b:includable id='main'>
<!-- only display title if it's non-empty -->
<b:if cond='data:title != ""'>
<h2 class='title'><data:title/></h2>
</b:if>
<div class='widget-content'>
<data:content/>
</div>
<b:include name='quickedit'/>
</b:includable>
</b:widget>

The 4 lines shown in blue instructs Blogger to include the title of this widget if the title is not empty. The key thing to note is the absence of the actual title here. What the template has is the XML element <data:title/>. Similarly, the 3 lines shown in red represent the body of the widget using the XML element <data:content/>. The line in green is what embeds the code needed for the Quick Edit (i.e. Screwdriver and Wrench icon you see when you are logged in to your blog) function.

<data:title/> and <data:content/> are special instructions to Blogger. When the blog actually loads up in a browser (i.e. when someone visits your blog),these two XML elements get replaced with the actual title and the content, fetched from the Blogger database.

Once the above widget is instantiated, the resulting HTML code you see is as follows.

<div class='widget Text' id='Text1'>
<h2 class='title'>Test Widget</h2>
<div class='widget-content'>
This is to a sample text widget.
</div>
<div class='clear'></div>
<span class='widget-item-control'>
<span class='item-control blog-admin'>
<a class='quickedit' href='http://www.blogger.com/rearrange?... title='Edit'>
<img alt='' src='http://www.blogger.com/img/icon18_wrench_allbkg.png'/>
</a>
</span>
</span>
<div class='clear'></div>
</div>

Here are the key changes.
  • The <b:widget> element is replaced with an HTML div element.
  • <b:includable> and <b:if> elements are not present
  • <data:title/> is replaced with the actual title "Test Widget"
  • <data:content/> is replaced with the actual content "This is to a sample text widget."
  • The quickedit line has stuffed in all the code needed to affect that behavior
If the widget title was empty, you will not see the blue line in the resulting HTML code.

This is how most of the widgets you see in Blogger get instantiated. The Blog widget, however, has some complex instantiation and we will take a look at it in another article.