This is the third in a series of articles about the Blog Widget, the most important widget in Blogger. First article was an overview of the widget and the second was about the status-message section.
In this part, we are going to take a look at the comments section.
If you open your template in HTML mode (i.e. Layout -> Edit HTML) and click on the Expand Widget Templates button, you can see the following code that encloses the comments section.
<b:includable id='comments' var='post'>
...
</b:includable>
...
</b:includable>
Everything about how to display the comments in a given post is described within the above includable section. This section is then included inside the main section as shown in red below.
<b:includable id='main' var='top'>
<!-- posts -->
<div class='blog-posts hfeed'>
<b:include data='top' name='status-message'/>
<data:adStart/>
<b:loop values='data:posts' var='post'>
<b:if cond='data:post.dateHeader'>
<h2 class='date-header'><data:post.dateHeader/></h2>
</b:if>
<b:include data='post' name='post'/>
<b:if cond='data:blog.pageType == "item"'>
<b:include data='post' name='comments'/>
</b:if>
...
</b:includable>
Notice that the comments section is enclosed in a <b:if> element. What it says is to show the comments section only if the pageType is equal to item. This is why we don’t see the comments in the blog’s homepage or archive pages. The default setup is to show comments only in the individual post pages.
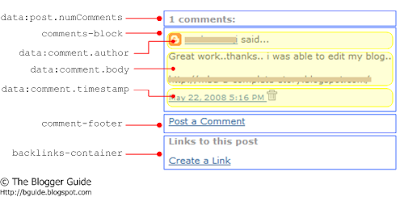
Now let’s get to the internals of the comments section. Before looking at the code, see the following illustration to understand the sub sections of the comments section.

The above figure has the regions of a screenshot of an actual comments section marked out, helping you to make the connections easily. As you can see, right on top is the numComments sub section showing the number of comments.
Next is the comments-block, which in turn is divided in to 3 parts; comment author, comment body and timestamp. The light yellow shading in the above figure highlights these 3 sub sections. The names of these 3 sub sections are self explanatory. comment-block section repeats the author, body and timestamp sub sections for every comment in a given post.
An important thing to note inside the timestamp sub section is the commentDeleteIcon, shown in red below. (This is one of the includables we discussed in part 1 of this series.).
<span class='comment-timestamp'>
<a expr:href='data:comment.url' title='comment permalink'>
<data:comment.timestamp/>
</a>
<b:include data='comment' name='commentDeleteIcon'/>
</span>
<a expr:href='data:comment.url' title='comment permalink'>
<data:comment.timestamp/>
</a>
<b:include data='comment' name='commentDeleteIcon'/>
</span>
This is the small trash can icon you see next to the timestamp in the above figure and it is displayed only when the blog’s admin is logged in. We will take a detail look at the commentDeleteIcon section later in this series.
Following the comments-block (i.e. after displaying all the comments) is the comment-footer which carries the Post a Comment link.
And finally is the back links section, which displays any other blog posts that link to the post in concern. The backlinks-container in turn includes the backlinks section, another includable of the Blog Widget.
That’s it. Hope you are now clear about the comments section of the Blog Widget. Did I manage to explain the somewhat complex code in this part clear enough? Let me know what you think.
Note:
One sub section I didn’t mention is the paging-control-container, which will break the display of the comments, over several “pages”. This will come in to play once the number of comments reaches a particular maximum number per page. However, I was not able to figure out what that maximum is and none of my posts have reached a level where the comment paging has taken place. If you do know that maximum number of comments per page, let me know.


