Friday, December 19, 2008

Contextual Advertising – Yahoo Publisher Network

Article Series: Blog Monetization

In the previous article, we looked at contextual advertising in general. This one will take a detail look in to one of those schemes, the Yahoo! Publisher Network.

Yahoo’s Publisher Network (YPN) is pretty much similar to Google AdSense in operation. Content Match is the AdSense counterpart and, in addition, YPN offers RSS ads. To get started, you need to sign up for a publisher account.

Displaying ads is just like in AdSesne, where you have to select from one of many ad formats and color schemes. Then you can attach an optional Reporting Category (similar to AdSense Channels) to that ad unit. Once defined, all you have to do is to copy the given ad code in to your blog or web site. In Blogger, the ad units can be easily incorporated with the use of an HTML/Javascript widget.

Unlike AdSense, Content Match does not impose a limit to the number of ad units that can be displayed on a page. One caveat, however, is that you cannot display ad units from another publisher in the same page in which YPN ads are displayed.

Earnings are on a Cost-per-Click basis, so your income potential depends on the numbers of visitors and the number of clicks they make. There are 4 payments methods and PayPal is one of them, allowing for convenient and quick receipt of earnings.

Compared to AdSense, availability of easy ad filtering by way of ad categories and sub categories is a plus. Additionally, ability to receive payments via PayPal is another important advantage over AdSense.

Wednesday, December 17, 2008

Blog Monetization – Contextual Advertising

Article Series: Blog Monetization

In this article, we will be looking at one of the most popular forms of web advertising, contextual advertising. Contextual Advertising refers to the mechanism of displaying advertisements relevant to the content of a web page currently viewed by a visitor. This is done via automated systems that scan the page content looking for advertising keywords and then display relevant ads for those keywords.

The contextual ads come in two main types; on-page ads such as Google AdSense or pop-up ads such as Vibrant Media. The payments are either based on the number of clicks (Cost per Click – CPC) or the number of types the ad is displayed (i.e. impressions) (Cost per Impression – CPM).

The two terms CPC and CPM are named from the point of view of the advertiser and not that of the publisher of the ad. For example, each time a visitor clicks on a contextual ad, the corresponding advertiser has to pay some amount to the ad network. That is the cost the advertiser has to pay the ad network for that click. The ad network pays a portion of that cost to the publishers.

Options
Here’s a (non-exhaustive) list of currently available contextual advertising schemes


References:

Tuesday, December 9, 2008

Blog Monetization

This one marks the beginning of a series of articles on one of the hottest topics amongst the bloggers all over, monetization. Much has been written about monetizing blogs, but the bitter truth is that it’s very hard. Nevertheless, the message from the people who have succeeded is that, if you have the commitment and the determination, making money blogging is not impossible. This series is an attempt to look at the state of the art of blog monetization and to enumerate the current know-how in the blogosphere, by looking at both the successes and the failures of others.

First of all, let’s have a look at the current income generation schemes available for bloggers. (This is a summarized listing of such schemes and the follow up articles will elaborate on each one.)

There are two primary types of blog-based income; direct and indirect. Though no standard definitions of these two types are found, we can describe direct income as those income generated in relation to the content of your blog. Indirect income can be described as those income generated through means other than in relation to the content.

Exploring further, we find today, the following popular direct income schemes.

  • Advertising – like in other types of media (TV, radio, newspapers etc.), advertising is a prime source of income for bloggers. This scheme can be further categorized as below.
    • Contextual Advertising – Display of ads relevant to your content (e.g. Google AdSense)
    • Search Advertising – Displaying ads for searching within your blog (e.g. AdSense for Search) or when you get visitors via search engines (e.g. Chitika)
    • Sponsorships (aka Targeted Advertising) – Getting vendors related to the content of your blog to display ads for time and size based (i.e. not per-click or per-impression) rates
  • Affiliate Schemes – this is where you earn commission when your readers buy items advertised in your blog. This differs from contextual advertising in that clicking on an affiliate ad alone will not give you any revenue. Amazon Associates is a famous example in this category.
  • Selling Your Content – Thirdly is the means of selling your own content in various print and electronic mediums. Books, ebooks, CD/DVDs etc are examples here.
In the indirect income type, we have a more variety of options.
  • Services (aka Consulting) – Once you build up a good readership and an image as a reliable source for professional help, you can start offering services at a charge. It could be advice on technical matters, search engine optimization, graphic designing, Internet marketing etc.
  • Sales of Goods (aka Merchandising) – This refers to selling materials such as T-shirts and caps to your readers, at a profit.
  • Paid Writing – You can write sponsored reviews about various products. PayPerPost is an example in this category. Writing for team blogs, doing outsourced writing for corporate blogs are other options here.
  • Donations – Offering genuine help to your readers and getting donations in return is another means of income for bloggers.
  • Selling the Blog – Lastly, is the act of selling out your blog. It could be a hard decision if you’ve put lot of hard work in building it up, but some people develop blogs with the intention of selling it.
All schemes above are not applicable for all types of blogs. Selecting what is suitable depends on factors such as the niche of your blog, your readership (e.g. merchandising is good if you have an established base of returning readers) and availability of advertisers.

In the coming articles we will be exploring each of these schemes in more detail.

References:

Saturday, December 6, 2008

Getting Better

Since its inception, The Blogger Guide has had a more technical focus. I’ve written about the basic of the Blogger template, explained the intricacies of converting to 3 columns and how to add custom CSS styles to Blogger. Then, there are the extremely popular step by step guides for three column conversions and wider post areas for many of the famous Blogger templates. And recently I completed a detailed series of posts looking at the internals of the Blog Widget.

Being a Computer Engineer, it’s no wonder that I have been writing articles with a technical focus. One of the primary objectives of this blog was to explain the technical details of Blogger, for the average non-technical user, in clear, simple English. Looking at the reactions from my readers, I can safely assume that I’ve been successful in doing that.

Starting from today, The Blogger Guide will expand its scope beyond the technicalities of Blogger. As the first step, I will venture in to one of the most sought after topics by bloggers, blog monetization. In other words, I will write about how you can make money blogging! But, without being a yet another listing of money making tips, I intend to offer a more complete guide including what those avenues are, how to incorporate them to your Blogger blog and their income potentials.

That’s not all. Tips on search engine optimization, Blogger templates and template design tips are all in the pipeline. And rest assured, I will continue to offer the technical assistance that you all found useful so far.

Sunday, November 30, 2008

Blog Widget - Part 5

Finally, in the fifth article of this series, we arrive at the core includable of the Blog widget, the post includable. So far, we've had an overview of the Blog widget, looked at the status-message, comments and next/previous posts sections. What's remaining to be addressed is the post section.

This is what controls the appearance of the most critical content of a Blogger blog, the posts. If you open your template in Edit HTML mode and click on the ‘Expand Widget Template’ checkbox, you can see the post includable defined as follows.

<b:widget id='Blog1' locked='true' title='Blog Posts' type='Blog'>

<b:includable id='post' var='post'>
</b:includable>


</b:widegt>

The <b:widget> section with the type=’Blog’ is the entire Blog widget and inside that, what goes in between <b:includable id='post' var='post'> and </b:includable> is the post includable.

First, let’s see the main sub sections of this includable, illustrated by the figure below.


The outer most element is the post hentry section. This is divided in to three sub elements, namely, the post title, the post body and the post footer. The post footer is in turn divided in to three more sub elements.

The above abstracted diagram is of little use. To make the real connection between all these code and an actual blog post, let’s map them on to a real blog post. The following illustration is just that.


The above figure overlays few rectangular regions on top of a screenshot of an actual blog post. The post title and post body sections are visible clearly. It is the post footer and its sub sections that are not so prominent. It should be now clear to you that the author name, time stamp, labels etc. that appear at the bottom of a post are in fact contained in the post footer section.

For example, the display of post labels is handled by this piece of code.

<div class='post-footer'>

<div class='post-footer-line post-footer-line-2'>
<span class='post-labels'>
<b:if cond='data:post.labels'>
<data:postLabelsLabel/>
<b:loop values='data:post.labels' var='label'>
<a expr:href='data:label.url' rel='tag'><data:label.name/></a><b:if cond='data:label.isLast != "true"'>,</b:if>
</b:loop>
</b:if>
</span>
</div>

...
</div>

The post-footer-line-3 is empty by default.

After a long series of articles (that spanned about 5 months due to time constraints) about the Blog widget, I assume that you are now confident enough to look under the hood to explore the structure of the Blog widget. Go ahead and take peak at the widget’s code.

Finally, you might ask, “What’s the use of knowing this anyway?”. Though for the most part you don’t have to meddle with the code underneath, knowledge of what controls the display of your posts can become handy when things go wrong sometimes. For example, see this thread on the Blogger Help Group where one blogger had a problem of missing the Next Previous post links from his blog and how it could be corrected by adding the missing ‘include’ statement for that section.

Thursday, November 13, 2008

Rounders 2 with a wider post area

Article Series: Wider 2 Column Templates - Step by Step Guides

Here are the steps to increase the width of the main post area of the Rounders 2 template by a desired amount. This is useful if you frequently upload images/embed videos etc that are wider than the default width of the post column. (For other Rounders templates, check the series home given above)

The Rounders 2 template uses images for the rounded header, footer and borders of the main post area. We need to expand these images when increasing the width of the post area. This tutorial uses custom images hosted on The Blogger Guide companion web site. (Note: The images used by templates must be hosted online.)

1) Decide the amount of pixels by which you want to increase the width of the post area. In this article, I will be expanding it by 240 pixels. (Note: You need background images that are expanded by the same size as the amount of pixels by which you expand your template. The steps here will only work for an expansion of 240 pixels)

2) Increase the width of the post area and its background images

  • Go to Layout -> Edit HTML
  • Locate the #main-wrap1 CSS selector (Do a Find using your browser)
  • Increase its width property by adding the amount of pixels picked in step (1). Here we change it to 725 by adding 240 to the default width of 485 pixels
  • Add a template variable to define the image host location as explained here. (This step will open up in a separate window. Return to the next bullet point after that)
  • Change the URL of the background property to the one shown in red below
#main-wrap1 {
width:725px;
float:$startSide;
background:$mainBgColor url("$imageHost/rounders2_corners_main_bot_w.gif") no-repeat $startSide bottom;
margin:15px 0 0;
...
}
  • Locate the #main-wrap2 CSS selector
  • Change the URL of the background property to the one shown in red below
#main-wrap2 {
float:$startSide;
width:100%;
background:url("$imageHost/rounders2_corners_main_top_w.gif") no-repeat $startSide top;
padding:10px 0 0;
}
  • Locate the #main CSS selector
  • Increase its width property to 725
  • Change the URL of the background property to the one shown in red below
#main {
background:url("$imageHost/rounders2_rails_main_w.gif") repeat-y left;
padding:0;
width:725px;
}
  • Locate the following CSS selectors and change their width properties as shown in red below.
.main .widget {
margin-top: 4px;
width: 708px;
padding: 0 13px;
}

.main .Blog {
margin: 0;
padding: 0;
width: 724px;
}

3) Increase the width of the other wrappers to accommodate the expanded main wrapper.
  • Locate the CSS section called #outer-wrapper
  • Increase its width property by the same amount of pixels selected in step (1)
#outer-wrapper {
width: 980px;
margin: 0 auto;
...
}

4) Replace the other background images with expanded ones as necessary.
  • Locate the following CSS selectors.
  • Replace the URLs of the images to the ones shown in red below.
#header-wrapper {
background:url("$imageHost/rounders2_corners_cap_top_w.gif") no-repeat $startSide top;
...
}

#header {
background:url("$imageHost/rounders2_corners_cap_bot_w.gif") no-repeat $startSide bottom;
...
}

#footer-wrap2 {
background:$titleBgColor url("$imageHost/rounders2_corners_cap_top_w.gif") no-repeat $startSide top;
color:$titleTextColor;
}

#footer {
background:url("$imageHost/rounders2_corners_cap_bot_w.gif") no-repeat $startSide bottom;
padding:8px 15px;
}

That's it! Click SAVE TEMPLATE and you should now have more room to play around with, in your main post area.

Note: You are free to use the images provided by me. But if you change your template according to this tutorial and use those images, please add the following code shown in red, right to the end of your template, in the place shown. It will simply link to this blog.

</div>

<a href="http://www.bloggerguide.lk/2008/04/wider-2-column-templates-step-by-step.html">Wider Two Column Modification</a> courtesy of <a href="http://www.bloggerguide.lk">The Blogger Guide</a>

</body>
</html>

Wednesday, November 12, 2008

Rounders 4 with a wider post area

Article Series: Wider 2 Column Templates - Step by Step Guides

Here are the steps to increase the width of the main post area of the Rounders 4 template by a desired amount. This is useful if you frequently upload images/embed videos etc that are wider than the default width of the post column. (For other Rounders templates, check the series home given above)

The Rounders 4 template uses images for the rounded header, footer and borders of the main post area. We need to expand these images when increasing the width of the post area. This tutorial uses custom images hosted on The Blogger Guide companion web site. (Note: The images used by templates must be hosted online.)

1) Decide the amount of pixels by which you want to increase the width of the post area. In this article, I will be expanding it by 240 pixels. (Note: You need background images that are expanded by the same size as the amount of pixels by which you expand your template. The steps here will only work for an expansion of 240 pixels)

2) Increase the width of the post area and its background images

  • Go to Layout -> Edit HTML
  • Locate the #main-wrap1 CSS selector (Do a Find using your browser)
  • Increase its width property by adding the amount of pixels picked in step (1). Here we change it to 725 by adding 240 to the default width of 485 pixels
  • Add a template variable to define the image host location as explained here. (This step will open up in a separate window. Return to the next bullet point after that)
  • Change the URL of the background property to the one shown in red below
#main-wrap1 {
width:725px;
float:$startSide;
background:$mainBgColor url("$imageHost/rounders4_corners_main_bot_w.gif") no-repeat $startSide bottom;
margin:15px 0 0;
...
}
  • Locate the #main-wrap2 CSS selector
  • Change the URL of the background property to the one shown in red below
#main-wrap2 {
float:$startSide;
width:100%;
background:url("$imageHost/rounders4_corners_main_top_w.gif") no-repeat $startSide top;
padding:10px 0 0;
}
  • Locate the #main CSS selector
  • Increase its width property to 725
  • Delete the background property (shown with a strike off below)
#main {
background:url("http://www.blogblog.com/rounders4/rails_main.gif") repeat-y left;
padding:0;
width:725px;
}
3) Increase the width of the other wrappers to accommodate the expanded main wrapper.
  • Locate the CSS section called #outer-wrapper
  • Increase its width property by the same amount of pixels selected in step (1)
#outer-wrapper {
width: 980px;
margin: 0 auto;
...
}

4) Replace the other background images with expanded ones as necessary.
  • Locate the following CSS selectors.
  • Replace the URLs of the images to the ones shown in red below.
#header-wrapper {
background:url("$imageHost/rounders4_corners_cap_top_w.gif") no-repeat $startSide top;
...
}

#header {
background:url("$imageHost/rounders4_bg_hdr_bot_w.jpg") no-repeat $startSide bottom;
...
}

#footer-wrap2 {
background:$titleBgColor url("$imageHost/rounders4_corners_cap_top_w.gif") no-repeat $startSide top;
color:$titleTextColor;
}

#footer {
background:url("$imageHost/rounders4_corners_cap_bot_w.gif") no-repeat $startSide bottom;
padding:8px 15px;
}

That's it! Click SAVE TEMPLATE and you should now have more room to play around with, in your main post area.

Note: You are free to use the images provided by me. But if you change your template according to this tutorial and use those images, please add the following code shown in red, right to the end of your template, in the place shown. It will simply link to this blog.

</div>

<a href="http://www.bloggerguide.lk/2008/04/wider-2-column-templates-step-by-step.html">Wider Two Column Modification</a> courtesy of <a href="http://www.bloggerguide.lk">The Blogger Guide</a>

</body>
</html>

Sunday, November 9, 2008

Rounders 3 with a wider post area

Article Series: Wider 2 Column Templates - Step by Step Guides

Here are the steps to increase the width of the main post area of the Rounders 3 template by a desired amount. This is useful if you frequently upload images/embed videos etc that are wider than the default width of the post column. (For other Rounders templates, check the series home given above)

The Rounders 3 template uses images for the rounded header, footer and borders of the main post area. We need to expand these images when increasing the width of the post area. This tutorial uses custom images hosted on The Blogger Guide companion web site. (Note: The images used by templates must be hosted online.)

1) Decide the amount of pixels by which you want to increase the width of the post area. In this article, I will be expanding it by 240 pixels. (Note: You need background images that are expanded by the same size as the amount of pixels by which you expand your template. The steps here will only work for an expansion of 240 pixels)

2) Increase the width of the post area and its background images

  • Go to Layout -> Edit HTML
  • Locate the #main-wrap1 CSS selector (Do a Find using your browser)
  • Increase its width property by adding the amount of pixels picked in step (1). Here we change it to 725 by adding 240 to the default width of 485 pixels
  • Add a template variable to define the image host location as explained here. (This step will open up in a separate window. Return to the next bullet point after that)
  • Change the URL of the background property to the one shown in red below
#main-wrap1 {
width:725px;
float:$startSide;
background:$mainBgColor url("$imageHost/rounders3_corners_main_bot_w.gif") no-repeat $startSide bottom;
margin:15px 0 0;
...
}
  • Locate the #main-wrap2 CSS selector
  • Change the URL of the background property to the one shown in red below
#main-wrap2 {
float:$startSide;
width:100%;
background:url("$imageHost/rounders3_corners_main_top_w.gif") no-repeat $startSide top;
padding:10px 0 0;
}
  • Locate the #main CSS selector
  • Increase its width property to 725
  • Change the URL of the background property to the one shown in red below
#main {
background:url("$imageHost/rounders3_rails_main_w.gif") repeat-y left;
padding:0;
width:725px;
}
  • Locate the following CSS selectors and change their width properties as shown in red below.
.main .widget {
margin-top: 4px;
width: 708px;
padding: 0 13px;
}

.main .Blog {
margin: 0;
padding: 0;
width: 724px;
}

3) Increase the width of the other wrappers to accommodate the expanded main wrapper.
  • Locate the CSS section called #outer-wrapper
  • Increase its width property by the same amount of pixels selected in step (1)
#outer-wrapper {
width: 980px;
margin: 0 auto;
...
}

4) Replace the other background images with expanded ones as necessary.
  • Locate the following CSS selectors.
  • Replace the URLs of the images to the ones shown in red below.
#header-wrapper {
background:url("$imageHost/rounders3_corners_cap_top_w.gif") no-repeat $startSide top;
...
}

#header {
background:url("$imageHost/rounders3_corners_cap_bot_w.gif") no-repeat $startSide bottom;
...
}

#footer-wrap2 {
background:$titleBgColor url("$imageHost/rounders3_corners_cap_top_w.gif") no-repeat $startSide top;
color:$titleTextColor;
}

#footer {
background:url("$imageHost/rounders3_corners_cap_bot_w.gif") no-repeat $startSide bottom;
padding:8px 15px;
}

That's it! Click SAVE TEMPLATE and you should now have more room to play around with, in your main post area.

Note: You are free to use the images provided by me. But if you change your template according to this tutorial and use those images, please add the following code shown in red, right to the end of your template, in the place shown. It will simply link to this blog.

</div>

<a href="http://www.bloggerguide.lk/2008/04/wider-2-column-templates-step-by-step.html">Wider Two Column Modification</a> courtesy of <a href="http://www.bloggerguide.lk">The Blogger Guide</a>

</body>
</html>

Saturday, November 1, 2008

3 Columns : Minima Lefty : Left and Right Sidebars

Article Series: 3 Column Step by Step Guides

Here are the steps to convert a default 2 column Minima Lefty template in to a three column template with two sidebars on left and right hand sides of the main post area.

The Minima Lefty gets its name because its default sidebar is on the left hand side, unlike the basic Minima template which has it on the right. In this tutorial, we will add a second sidebar to the right hand side of a default Minima Lefty template.

(If you really want to understand what's happening here, read the article series Three Column Templates Explained.)

1) Add a new CSS id selector for the 2nd sidebar wrapper.

  • Go to Layout -> Edit HTML
  • Locate the #sidebar-wrapper section (Do a Find using your browser)
  • Copy that full section and paste below the existing sidebar section (it doesn't have to be below) and rename it to #right-sidebar-wrapper
  • Change the float:$startSide to float:$endSide of this newly copied section (See the code snippet below)
#sidebar-wrapper {
width: 220px;
float: $startSide;
word-wrap: break-word; /* fix for ... in IE */
overflow: hidden; /* fix for long ... float */
}

#right-sidebar-wrapper {
width: 220px;
float: $endSide;
word-wrap: break-word; /* fix for ... IE */
overflow: hidden; /* fix for long ... float */
}

2) Introduce a new div element, as a child of the content-wrapper, to be the placeholder for the 2nd sidebar
  • Locate the <div id='main-wrapper'> element.
  • Copy the code shown in red, above that section (this has to be above)

<div id='crosscol-wrapper' style='text-align:center'>
<b:section class='crosscol' id='crosscol' showaddelement='no'/>
</div>

<div id='right-sidebar-wrapper'>
<b:section class='sidebar' id='sidebar-two' preferred='yes'>
</b:section>
</div>

<div id='main-wrapper'>
<b:section class='main' id='main' showaddelement='no'>
<b:widget id='Blog1' locked='true' title='Blog Posts' type='Blog'/>
</b:section>
</div>

3) Expand the width of the other wrappers to accommodate the new sidebar
  • Locate the CSS sections called #outer-wrapper, #header-wrapper and #footer
  • Change their width property to 880 pixels

#outer-wrapper {
width: 880px;
margin: 0 auto;
...
}

#header-wrapper {
width: 880px;
margin: 0 auto 10px;
...
}

#footer {
width: 880px;
clear: both;
margin: 0 auto;
...
}

4) Do necessary adjustments to margins, padding etc
  • Locate the #main-wrapper section
  • Insert a right margin of 12 pixels.

#main-wrapper {
width: 410px;
margin-right:12px;
float: $endSide;
...
}

5) Adjust the max width of the header description to center it in the new expanded header
  • Locate the #header .description section
  • Change the max-width property to 880 pixels.
#header .description {
...
padding:0 20px 15px;
max-width:880px;
...
}

Note: Step 6 is only needed if your Layout Editor does not show the newly added sidebar. There was an issue where the Firefox browser didn't show a 3 column template fully in the edit mode. But Blogger reports that the issue has been fixed now.

6) Modify the CSS rules for the wire frame layouts editor.
  • Locate the end of the skin denoted by "]]>"
  • Add the following code shown in red, above that line.

/** Page structure tweaks for layout editor wireframe */

body#layout #outer-wrapper {
padding-top: 0;
width:720px;
}
body#layout #header-wrapper,
body#layout #content-wrapper,
body#layout #footer {
padding: 0;
width:720px;
}

body#layout #main-wrapper {
width:400px;
}

body#layout #sidebar-wrapper,
body#layout #right-sidebar-wrapper {
width:150px;
}

]]></b:skin>

Save the template. Switch to Page Elements view and enjoy your 3 column template!

Follow The Blogger Guide

I've just made it easier for you to follow The Blogger Guide, by enabling Blogger's Followers widget. Now you can easily keep track of all the clear and simple technical tutorials and tips that you always loved.

Go ahead and become a follower and show your appreciation! Thank you.

Saturday, October 25, 2008

Blog Widget - Part 4

The Blog Widget is what controls all the posts and their comments in Blogger blogs. Hence, it is obviously the most important widget in Blogger.

This is the fourth in a series of articles covering the details of the Blog widget. In part three, we studied the comments section and in this one, we will dig in to the details of the next, previous posts and feed subscription links. These are the links that appear at the bottom of the posts column.


The above figure shows a typical display of these links at the end of the posts on a given page.

The light blue shading shows the area in which Newer Posts and Older Posts links appear. The behavior of this section is defined by the includable section with the id nextprev. It optionally contains a link to the blog’s home page when viewing pages other than the home page.

The feedLinks includable, highlighted in orange, is what displays the “Subscribe to:” link. When the blog’s home page is viewed, this section displays the link to the posts feed and in individual pages, it carries the post comments feed link.

The illustration above has a mapping of the actual includable sections in the Blogger template to how they are visually displayed when a blog is loaded in a browser window. That should help the more curious readers to open their templates in Edit HTML mode and investigate further.

So far we have covered all the major sections of the Blog Widget other than the most crucial section; i.e. the main includable. Let’s have a go at that in the next article.

Sunday, October 5, 2008

3 Columns : Ms Moto : Left and Right Sidebars

Article Series: 3 Column Step by Step Guides

Here are the steps to convert a default two column Ms Moto template in to a three column template with sidebars on the left and right hand side of the main post area.

(If you really want to understand what's happening here, read the article series Three Column Templates Explained.)

1) Add a new CSS id selector for the 2nd sidebar wrapper.

  • Go to Layout -> Edit HTML
  • Locate the #sidebar section (Do a Find using your browser)
  • Copy that full section and paste above the existing sidebar section (it doesn't have to above) and rename it to #left-sidebar
  • Change the float: $endSide to float:$startSide (See the code snippet below)

#left-sidebar {
width: 226px;
float: $startSide;
color: $sidebarTextColor;
word-wrap: break-word; /* fix for ... IE */
overflow: hidden; /* fix for long ... */
}

#sidebar {
width: 226px;
float: $endSide;
color: $sidebarTextColor;
word-wrap: break-word; /* fix for ... IE */
overflow: hidden; /* fix for long ... */
}


2) Introduce a new div element, as a child of the content-wrapper, to be the placeholder for the 2nd sidebar
  • Locate the <div id='main-wrapper'> element.
  • Copy the code shown in red, above that section (this has to be above)

<div id='crosscol-wrapper' style='text-align:center'>
<b:section class='crosscol' id='crosscol' showaddelement='no'/>
</div>

<div id='left-sidebar-wrapper'>
<b:section class='sidebar' id='left-sidebar' preferred='yes'>
</b:section>
</div>

<div id='main-wrapper'>
<b:section class='main' id='main' showaddelement='no'>
<b:widget id='Blog1' locked='true' title='Blog Posts' type='Blog'/>
</b:section>
</div>


3) Expand the width of the parent wrappers to accommodate the new sidebar
  • Locate the CSS section called #outer-wrapper
  • Change its width property to 918 pixels

#outer-wrapper {
margin: 0 auto;
border: 0;
width: 918px;
...
}


4) Do necessary adjustments to margins, padding etc
  • Locate the #main section
  • Insert a left margin of 14 pixels.

#main {
width: 400px;
margin-$startSide:14px;
float: $startSide;
...
}


5) Modify and expand the background images as necessary.
  • Add a template variable to define the image host location as explained here. (This step will open up in a separate window. Return to the next bullet point after that)
  • Locate the following CSS sections.
  • Replace the URL of the background images to thes one shown in red below.

body {
...
background: #d7b url($imageHost/msmoto_outerwrap_w.gif) top center repeat-y;
...
}

#outer-wrapper {
...
background: #ffffff url($imageHost/moto_innerwrap_w.gif) top right repeat-y;
...
}


6) Modify the CSS rules for the wire frame layouts editor.
  • Locate the section that starts with "/** Page structure tweaks for layout editor wireframe */"
  • Replace that entire section with the following code.

/** Page structure tweaks for layout editor wireframe */

body#layout #outer-wrapper {
padding-top: 0;
width:720px;
}
body#layout #header,
body#layout #content-wrapper,
body#layout #footer {
padding: 0;
width:720px;
}

body#layout #main {
width:400px;
}

body#layout #sidebar,
body#layout #left-sidebar {
width:150px;
}

]]></b:skin>

Save the template. Switch to Page Elements view and enjoy your 3 column template! (The new sidebar might not be visible until you add some gadgets to it)

Note: You are free to use the images provided by me. But if you change your template according to this tutorial and use those images, please add the following code shown in red, right to the end of your template, in the place shown. It will simply link to this blog.

</div>

<a href="http://www.bloggerguide.lk/2008/02/3-columns-step-by-step-guides.html">Three Column Modification</a> courtesy of <a href="http://www.bloggerguide.lk">The Blogger Guide</a>

</body>
</html>


Wednesday, October 1, 2008

HOWTO: Add an image beside a URL

In this article, we will learn a simple technique to display an image by the side of a URL. This method uses a simple CSS class to dress up the URL.

First, we need to select an image to be displayed. In this example, I'm using a 14x14 pixel image hosted on this blog's companion site. (Note: The selected image must be hosted online)

Then, we add a simple CSS rule, such as the one below, to the blog's skin.

a.image {
padding-right:16px;
background:url(http://thebloggerguide.googlepages.com/icon_ext_window.png) no-repeat 100% 50%;
}

In the above code, the a.image selector is called, in CSS jargon, a class selector. What that means is that any anchor element (i.e. <a>) that has the class property set to image will be modified according to the rules defined in that selector. In this instance, the first rule tells the browser to insert some space (i.e. padding) to the right of the URL and the second rule inserts a background image to be displayed in that space.

The following screenshot illustrates how this CSS code can be added by going to Layout -> Edit HTML.


Once this code is added to the blog skin, it is available to be used from within blog posts.

The last step is to attach this CSS rule to the URL that needs to be modified. All you need to do is to add class="image" attribute to that URL.

<a href="some URL" class="image">The Link Text</a>

For example, the following HTML:

<a href="http://thebloggerguide.googlepages.com" class="image">The Blogger Guide Web Site</a>

will be displayed as follows.

The Blogger Guide Web Site

That's it. Try it yourself and let me know how it goes.

PS:
This is the first post after a long silence of about 3 months. Though new content was not added, I was responding to my readers' queries. Hope to get back to more frequent posting again. Many thanks to all the readers out there!

Tuesday, July 1, 2008

HOWTO: Add a Recent Posts Feed

If you want to add a feed that shows your Recent Posts in the sidebar, you can use the BuzzBoost feature from FeedBurner (www.feedburner.com). It is very simple.

First, burn your feed at FeedBurner. Then go to your feed's homepage on FeedBurner and click the Publicize tab. From that section select BuzzBoost. (See figure below)


Configure the number of posts to display and the content to appear and then copy the given Javascript code. Add it to your blog using an HTML/Javascript widget. (You can alternatively use the "Use as a widget in" option provided on the BuzzBoost page. This will take you to the "Import Page Element" page of Blogger.)

That's it. View your blog and you will see the recent posts appearing on your sidebar.

Saturday, June 14, 2008

Blog Widget - Part 3

This is the third in a series of articles about the Blog Widget, the most important widget in Blogger. First article was an overview of the widget and the second was about the status-message section.

In this part, we are going to take a look at the comments section.

If you open your template in HTML mode (i.e. Layout -> Edit HTML) and click on the Expand Widget Templates button, you can see the following code that encloses the comments section.

<b:includable id='comments' var='post'>
...
</b:includable>

Everything about how to display the comments in a given post is described within the above includable section. This section is then included inside the main section as shown in red below.

<b:includable id='main' var='top'>
<!-- posts -->
<div class='blog-posts hfeed'>

<b:include data='top' name='status-message'/>

<data:adStart/>
<b:loop values='data:posts' var='post'>
<b:if cond='data:post.dateHeader'>
<h2 class='date-header'><data:post.dateHeader/></h2>
</b:if>
<b:include data='post' name='post'/>
<b:if cond='data:blog.pageType == "item"'>
<b:include data='post' name='comments'/>
</b:if>

...
</b:includable>

Notice that the comments section is enclosed in a <b:if> element. What it says is to show the comments section only if the pageType is equal to item. This is why we don’t see the comments in the blog’s homepage or archive pages. The default setup is to show comments only in the individual post pages.

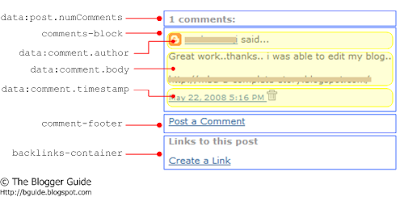
Now let’s get to the internals of the comments section. Before looking at the code, see the following illustration to understand the sub sections of the comments section.


The above figure has the regions of a screenshot of an actual comments section marked out, helping you to make the connections easily. As you can see, right on top is the numComments sub section showing the number of comments.

Next is the comments-block, which in turn is divided in to 3 parts; comment author, comment body and timestamp. The light yellow shading in the above figure highlights these 3 sub sections. The names of these 3 sub sections are self explanatory. comment-block section repeats the author, body and timestamp sub sections for every comment in a given post.

An important thing to note inside the timestamp sub section is the commentDeleteIcon, shown in red below. (This is one of the includables we discussed in part 1 of this series.).

<span class='comment-timestamp'>
<a expr:href='data:comment.url' title='comment permalink'>
<data:comment.timestamp/>
</a>
<b:include data='comment' name='commentDeleteIcon'/>
</span>

This is the small trash can icon you see next to the timestamp in the above figure and it is displayed only when the blog’s admin is logged in. We will take a detail look at the commentDeleteIcon section later in this series.

Following the comments-block (i.e. after displaying all the comments) is the comment-footer which carries the Post a Comment link.

And finally is the back links section, which displays any other blog posts that link to the post in concern. The backlinks-container in turn includes the backlinks section, another includable of the Blog Widget.

That’s it. Hope you are now clear about the comments section of the Blog Widget. Did I manage to explain the somewhat complex code in this part clear enough? Let me know what you think.

Note:
One sub section I didn’t mention is the paging-control-container, which will break the display of the comments, over several “pages”. This will come in to play once the number of comments reaches a particular maximum number per page. However, I was not able to figure out what that maximum is and none of my posts have reached a level where the comment paging has taken place. If you do know that maximum number of comments per page, let me know.

Thursday, June 12, 2008

CSS Selectors in Blogger Templates

The look and feel of Blogger templates are controlled by the Cascading Style Sheet (CSS) rules defined in the template skin. Currently, there are 38 different templates available from Blogger. These templates use a number of different CSS selectors or rules.

Some of these selectors are common to all the templates and some are specific to certain templates. Knowledge about which selectors are used by which templates is useful when trying to tweak the formats and styles of Blogger templates.

Here is a matrix showing the CSS selectors against the Blogger templates in which they are used. This can be used as a reference when you want to find out what CSS selectors can be used to modify the look and feel of your tempalte.

A screenshot of the first page of this matrix is given below.


Note:
This matrix has been generated by a program that processed all the templates. It's very difficult to check whether all the selectors are properly marked for all the templates. If you find any errors in the matrix, please let me know.

Thursday, June 5, 2008

URLs

Here are some common questions about URLs and adding hyperlinks in Blogger.

What is a URL?
URL stands for Uniform Resource Locator. It is a way of uniquely identifying the location of a resource (such as a web page, an image etc) on the vastly complex network of the Internet.

The key word here is “uniform” meaning uniqueness; i.e. a given URL should point to one and only one resource on the Internet. In other words, the same URL cannot point to (i.e. identify) more than one resource. Two URLs, however, can point to the same resource.

How do I represent a URL in HTML?
HTML uses the “anchor” element ( i.e. <a>…</a>) to define URLs. The word anchor gives the idea of linking. When an anchor element is used to refer to a URL, the resulting entity is usually referred to as a hyperlink.

The usual syntax of the anchor element is shown below.

<a href="url to link to">Link Text</a>
  • <a …> is the opening tag
  • href (or hyperlink reference) is an attribute which carries the URL of the page to link to as the attribute value
  • Link Text is the text that will be actually displayed on the browser
  • </a> is the closing tag, which marks the end of the anchor element
For example, when:

<a href="http://bguide.blogspot.com">The Blogger Guide</a>

is entered in to the HTML code of a web page, the following hyperlink will appear on that page.

The Blogger Guide

How do I open a link in a new tab/window?
Sometimes when you click on a hyperlink, the target page opens in a separate window or tab of the browser. (Whether it opens on a new tab or a window actually depends on the settings of the browser)

The way to achieve this is to add the attribute target with the value _blank inside the opening tag of the anchor element.

E.g.

<a href="url" target="_blank">Link Text</a>

How do I add a hyperlink in Blogger?
There are two ways in which you can add a hyperlink in Blogger.

One is to use the Compose (i.e. WYSIWIG) mode editor.
Steps:
  1. Highlight the text that should be linked
  2. Click on the Hyperlink icon
  3. Enter the URL to link to and click OK
See the figure below for an illustration of the above steps.


The other method is to directly type the HTML code in the Edit Html mode of the post editor as shown below.


Note:
If you want add the target="_blank" part, then you have to use the Edit Html mode and change the HTML code.

Wednesday, June 4, 2008

Blog Widget - Part 2

In the previous article of this series, we had an overview of the Blog widget covering its basic components. In that article, we learned the main includables and their order of inclusion.

In this article we will take a look at the status-message includable.

If you open your template in HTML mode (i.e. Layout -> Edit HTML) and click on the Expand Widget Templates button, you can see the following code that defines the status-message section.

<b:includable id='status-message'>
<b:if cond='data:navMessage'>
<div class='status-msg-wrap'>
<div class='status-msg-body'>
<data:navMessage/>
</div>
<div class='status-msg-border'>
<div class='status-msg-bg'>
<div class='status-msg-hidden'><data:navMessage/></div>
</div>
</div>
</div>
<div style='clear: both;'/>
</b:if>
</b:includable>

And this particular section will be included in the main section as follows.

<b:includable id='main' var='top'>
<!-- posts -->
<div class='blog-posts hfeed'>

<b:include data='top' name='status-message'/>

...
</b:includable>

This section, however, is not a very important part of the Blog widget. There are two instances in which this section comes in to play; when someone searches your blog using the Search box in the Navigation Bar or clicks on one of the Labels.

For example, if some searches for the string "text widget", the status message will be displayed as follows.


So that's the status-message section of the Blog widget.

Tuesday, June 3, 2008

Blog Widget - Part 1

The Blog Widget is the most important widget in Blogger. It contains the core content of a blog including its posts, comments, back links and feed links. In other words, this is what defines the composition of the main column of a Blogger blog.

Knowing the finer points of the Blog widget is very valuable to any Blogger user. Since it is so important, I'm going to explain this widget over several articles. This is the first part of a multi part article series on the Blog widget.

As with any widget, the Blog widget also has a primary <b:includable> section with an id='main'. However, it also contains a number of other <b:includable> sections, each serving a valuable purpose. They are:

  • status-message
  • post
  • postQuickEdit
  • comments
  • commentDeleteIcon
  • backlinks
  • backlinkDeleteIcon
  • nextprev
  • feedLinks
  • feedLinksBody
These includables are the building blocks of the Blog widget. If we equate the Blog widget to a car, think of the main includable as the chassis and the others as various components such as the body, engine, seats etc. of that car. The final Blog widget is the result of assembling these includables in a particular order. This hierarchy of assembly is illustrated in the figure below.


At the first level of inclusions in the main section are the status-message, post, comments (only in item pages), nextprev and feedLinks sections. The post section in turn includes the postQuickEdit section. commentDeleteIcon and backlinks sections are contained within the comments section and the backlinks section in turn includes the backlinkDeleteIcon section. Finally, the feedLinks contains the feedLinksBody section.

In the articles to follow, we will probe each of these includable sections one by one.

Sunday, June 1, 2008

Widget Instantiation

The template is a crucial element of the new Layout Blogger blogs. It defines the arrangement of the main post column and the sidebar, layout of blog elements such as the posts, widgets, headers etc. and also the fonts and colors of its look and feel. Understanding the template is, therefore, very useful in understanding how your blog behaves.

In two previous articles we looked at the primary components and the basic skeleton of a Blogger template. In this article, we will dig in to the more specific topic of widgets. More precisely, we are going to see how widgets get instantiated.

Instantiation has a very specific meaning in a technical context. In programmers' jargon, it means creating a specific instance from a generic template. In laymen terms, think of a template as a mould and instantiation as the act of moulding out a shape from that mould. So, the widget we see in the template is the mould and when the blog is actually viewed in a browser window, what we see is the moulded shape (or the instantiated widget).

Let's look at an example to be more clear about this instantiation process.

Consider a simple Text widget with a title and some sample text in its body. If you go to Layout -> Edit HTML, all you see as your widget is a single line similar to the one shown below.

<b:widget id='Text1' locked='false' title='Test Widget' type='Text'/>

If you click on the Expand Widget Templates check box, the above single line will be expanded to the complete widget shown below.

<b:widget id='Text1' locked='false' title='Test Widget' type='Text'>
<b:includable id='main'>
<!-- only display title if it's non-empty -->
<b:if cond='data:title != ""'>
<h2 class='title'><data:title/></h2>
</b:if>
<div class='widget-content'>
<data:content/>
</div>
<b:include name='quickedit'/>
</b:includable>
</b:widget>

The 4 lines shown in blue instructs Blogger to include the title of this widget if the title is not empty. The key thing to note is the absence of the actual title here. What the template has is the XML element <data:title/>. Similarly, the 3 lines shown in red represent the body of the widget using the XML element <data:content/>. The line in green is what embeds the code needed for the Quick Edit (i.e. Screwdriver and Wrench icon you see when you are logged in to your blog) function.

<data:title/> and <data:content/> are special instructions to Blogger. When the blog actually loads up in a browser (i.e. when someone visits your blog),these two XML elements get replaced with the actual title and the content, fetched from the Blogger database.

Once the above widget is instantiated, the resulting HTML code you see is as follows.

<div class='widget Text' id='Text1'>
<h2 class='title'>Test Widget</h2>
<div class='widget-content'>
This is to a sample text widget.
</div>
<div class='clear'></div>
<span class='widget-item-control'>
<span class='item-control blog-admin'>
<a class='quickedit' href='http://www.blogger.com/rearrange?... title='Edit'>
<img alt='' src='http://www.blogger.com/img/icon18_wrench_allbkg.png'/>
</a>
</span>
</span>
<div class='clear'></div>
</div>

Here are the key changes.
  • The <b:widget> element is replaced with an HTML div element.
  • <b:includable> and <b:if> elements are not present
  • <data:title/> is replaced with the actual title "Test Widget"
  • <data:content/> is replaced with the actual content "This is to a sample text widget."
  • The quickedit line has stuffed in all the code needed to affect that behavior
If the widget title was empty, you will not see the blue line in the resulting HTML code.

This is how most of the widgets you see in Blogger get instantiated. The Blog widget, however, has some complex instantiation and we will take a look at it in another article.

Saturday, May 31, 2008

Show Your Appreciation

Hope something on this blog has been useful to you and I assume that’s why you are here. It’s indeed my pleasure to have you helped you! Given below are some methods in which you can show your appreciation.

Donate
Make a small donation to cover my basic costs. Remember, every dollar counts, so donate only what you are comfortable with. And there’s no obligation at all; donate only if you wish to do so. :-) Use the PayPal Donate button in the sidebar to donate.

Link to This Blog
You are absolutely free to use the various resources such as images, scripts etc provided with some of the tutorials. However, if you do use them, I appreciate if you can put The Blogger Guide to your Blog List and/or write a post in your blog linking to the relevant tutorial

Bookmark the Articles
Sharing and bookmarking the articles is another good way to say thanks. Submit to Digg, Stumble, add to Technorati favorites or add to whatever social bookmarking service you use.

Rate My Posts/Blog
If you found this blog via an answer given by me on a forum such as Blogger Help Group, Blogger Forum or BlogCatalog, then please rate or rank my posts/blog on those forums.

Spread the Word
Tell your friends and family; refer them to The Blogger Guide.

Thank You,
ids.

Friday, May 30, 2008

Scribe with a wider post area

Article Series: Wider 2 Column Templates - Step by Step Guides

Here are the steps to increase the width of the main post area of the Scribe template by a desired amount. This is useful if you frequently upload images/embed videos etc that are wider than the default width of the post column.

1) Decide the amount of pixels by which you want to increase the width of the post area. In this article, I will be expanding it by 200 pixels. (In fact, you can pick an arbitrary size and experiment to see if that is enough for you)

2) Increase the width of the post area

  • Go to Layout -> Edit HTML
  • Locate the #main CSS selector (Do a Find using your browser)
  • Increase its width property by adding the amount of pixels picked in step (1). Here we change it to 630 by adding 200 to the default width of 430 pixels

#main {
width:630px;
float:$endSide;
...
}

3) Increase the width of the other wrappers to accommodate the expanded main wrapper.
  • Locate the following CSS sections
  • Change their width property to 900 pixels

#outer-wrapper {
...
width:900px;
...
}

#main-top {
width:900px;
...
}

#main-bot {
width:900px;
...
}

#wrap2 {
width:900px;
...
}

4) Replace the other background images with expanded ones as necessary.
  • Add a template variable to define the image host location as explained here. (This step will open up in a separate window. Return to the next bullet point after that)
  • Locate the following CSS selectors.
  • Replace the URLs of the images to the ones shown in red below.

#main-top {
width:900px;
height:49px;
background:#FFF3DB url("$imageHost/scribe_bg_paper_top_w.jpg") no-repeat top left;
...
}

#main-bot {
width:900px;
height:81px;
background:#FFF3DB url("$imageHost/scribe_bg_paper_bot_w.jpg") no-repeat top left;
...
}

#wrap2 {
width:900px;
background:#FFF3DB url("$imageHost/scribe_bg_paper_mid_w.jpg") repeat-y;
...
}

#header {
background:url("$imageHost/scribe_divider_w.gif") no-repeat bottom $startSide;
}

#footer {
clear:both;
background:url("$imageHost/scribe_divider_w.gif") no-repeat top $startSide;
...
}

That's it! Click SAVE TEMPLATE and you should now have more room to play around with, in your main post area.

Note: You are free to use the images provided by me. But if you change your template according to this tutorial and use those images, please add the following code shown in red, right to the end of your template, in the place shown. It will simply link to this blog.

</div>

<a href="http://www.bloggerguide.lk/2008/04/wider-2-column-templates-step-by-step.html">Wider Two Column Modification</a> courtesy of <a href="http://www.bloggerguide.lk">The Blogger Guide</a>

</body>
</html>

Tuesday, May 27, 2008

Denim with a wider post area

Article Series: Wider 2 Column Templates - Step by Step Guides

Here are the steps to increase the width of the main post area of the Denim template by a desired amount. This is useful if you frequently upload images/embed videos etc that are wider than the default width of the post column.

1) Decide the amount of pixels by which you want to increase the width of the post area. In this article, I will be expanding it by 200 pixels. (In fact, you can pick an arbitrary size and experiment to see if that is enough for you)

2) Increase the width of the post area

  • Go to Layout -> Edit HTML
  • Locate the #main-wrapper CSS selector (Do a Find using your browser)
  • Increase its width property by adding the amount of pixels picked in step (1). Here we change it to 664 by adding 200 to the default width of 464 pixels.

#main-wrapper {
width: 664px;
float: $startSide;
...
}

3) Increase the width of the other wrappers to accommodate the expanded main wrapper.
  • Locate the CSS sections called #content-wrapper and #header
  • Increase their width property by the same amount of pixels selected in step (1)

#content-wrapper {
width: 960px;
margin: 0 auto;
...
}

#header {
width: 960px;
margin: 0 auto;
...
}

That's it! Preview and experiment with different increments. Click SAVE TEMPLATE once you get the required increment.

You should now have more room to play around with, in your main post area.

Sunday, May 25, 2008

Understanding the robots.txt File

The robots.txt file is useful in blocking off some of the pages of your blog/site from search engine crawlers. In this article, we will take a look at some of the commonly asked question about the robots.txt file, with a particular focus on Blogger blogs.

The questions are ordered with a logical flow so that you can read them from top to bottom as well.


What is a Robot?
A Robot (aka wanderer, crawler or spider) is a computer program that traverses the web automatically.

Even though these names give you the feeling that these programs “travel around” the Internet, they really don’t travel from computer to computer. What they, in fact, do is to follow the hyperlinks found on web pages by issuing download requests for each of those hyperlinked pages.

Crawling, however, is a separate topic that falls beyond the scope of this article.

What is the robots.txt file?
This is a simple ASCII text file and its name must be written in all lowercase letters as robots.txt. It should be located at the root directory of your domain. Usually, in a website, this is where you keep your index.html file.

In Blogger blogs, this is located at the following address.

http://<your-blog-name>.blogspot.com/robots.txt

For example, if your blog name is my-great-blog, then your robots.txt file can be viewed by typing the following address in to browser’s address bar.

http://my-great-blog.blogspot.com/robots.txt

What is the format of this file?
A typical robots.txt file consists of one or more sets of rules or directions for search engine robots. Each set of rules comprises of two or more instructions written on adjacent new lines. Rule sets are separated by blank new lines.

Here’s a typical example file from a blogspot blog. (Line numbers are added for referencing only. The actual file does not contain them)

1: User-agent: Mediapartners-Google
2: Disallow:
3:
4: User-agent: *
5: Disallow: /search

Lines 1 & 2 form one set of rules and lines 4 & 5 form another set. They are separated by the blank line 3.

A typical rule set starts with a User-agent: line which identifies one or more robots. Then it will have one or more Disallow: [or Allow:] commands, in separate, adjacent new lines.

For example, in the second rule set above:
  • User-agent: * - means all user agents
  • Disallow: /search - means “don’t crawl any URL that starts with http://.blogspot.com/search/…. In Blogger, this rule will block off all Labels. It’s added by default, because the Label pages just display the individual pages belonging to that label, which the robots will anyway find while crawling the rest of the site.

For more details see:

What is the use of the robots.txt file?
As you’ve probably realized by now, the robots.txt file is used to prevent robots from crawling certain areas of your site/blog.

However, remember that not all robots respect this file. For example, spam bots, which scan the web to steal email addresses, can ignore the Disallow: commands and enter those pages. So the robots.txt file is not a good way to hide your secure information.

Can I edit the robots.txt file?
Unfortunately, Blogger users cannot edit their robots.txt file. It is maintained by Blogger itself and you cannot upload your own file instead of the default one.

But, if you manage a site where you can upload files to the root domain, then you can use the tools provided by the Google Webmaster Tools (GWT) console to edit the robots.txt file. Once you have verified your blog with GWT, this is available from the Tools section of the left side navigation bar.


The Analyze robots.txt tool lets you test your rules to see what URLs they actually allow or disallow. This is good to avoid any un-intentional block offs by syntax errors in your file.

The Generate robots.txt tool has a simple user interface to create a file, even if you are not sure of the file’s syntax. Once generated, you can download the file to your machine and then upload it to your site’s root domain.