Google Webmaster Tools (GWT) is a service that helps you to see and control how Google sees your site/blog. It provides lot of statistics such as the index stats (i.e. what pages of your site are currently in Google's index), crawl stats etc. It lists various errors encountered by Googlebot while crawling your site. You can use it to submit sitemaps of your site to Google and also remove certain URLs of your site from the Google's index.
This article will illustrate how to add your blog to GWT and then verify it.
Add Site
Before you add a site you need to sign in to the service with a Google account. Then enter the URL of your blog's homepage and click Add Site.
Verify Site
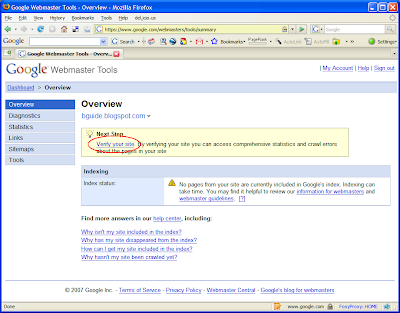
Once you add your blog, it will appear on your dashboard. Click on that and you will go the Overview page for your blog. As soon as you add it, the blog will be in the unverified state. Therefore you will see a message asking you to verify it. Verification is the process by which you confirm to GWT that you are the owner of this blog.
Click on Verify your site link.
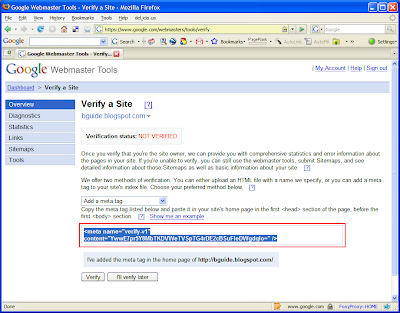
From the Verify a Site page, select Add a meta tag as the verification method.
You will then be presented with a meta tag. Copy the whole tag.
Go to your blog's Layout Editor and open the Edit HTML mode. Paste the meta tag you just copied immediately under the <head> tag. Save the template and go back to GWT.
Click on the Verify button.
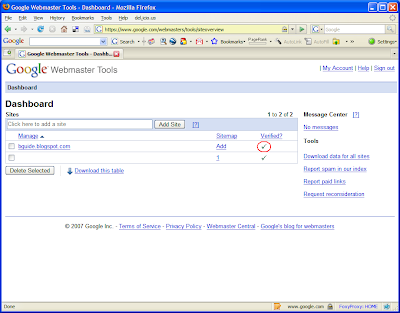
Go back to your dashboard and check whether the verification step is complete. (It might take a few minutes to get your status updated).
That's it. You have now added and verified your blog to GWT. Next step would be to submit a Sitemap to Google Webmaster Tools for Googlebot to start crawling your site.


