Thursday, May 28, 2009
How I got a Page Rank of 4
Saturday, May 16, 2009
Technorati Authority
In a previous post, we looked at the Alexa Traffic Rank and its importance. This one will take a peek at another popular blog ranking method called the Technorati Authority.
Technorati is a blog search engine that indexes millions of blogs around the world. Because of its massive index, it can instantly identify which blog is linking to which other blogs in the blogosphere. This data is used by Technorati to calculate a metric which they refer to as authority.
Stated simply, Technorati Authority is the number of blogs linking to a website in the last six months. Higher the blogs that link to a given blog, higher the authority it has. A blog will get more incoming links if it is writing quality, authoritative content that is accepted by others.
Because only the links that are made during the last six months are counted towards authority, one needs to keep producing better content to be able to get new links. But even old articles which are discovered by new visitors to a site may attract new links. Multiple links from the same site are counted only once. But a recent link from such a site will refresh its vote for another six months.
One problem though is that only blogs which are on Technorati, or in other words, which are indexed by Technorati will add to your authority. If a blog which is not listed on Technorati links to your blog, Technorati is not able to count it.
Friday, May 8, 2009
Alexa Traffic Rank
There are many ranking systems that measure the popularity and the quality of websites and blogs. Google Page Rank, Alexa Traffic Rank, Compete and mozRank are some examples of such systems. There are some other ranks such as the Technorati Authority and BlogCatalog Rank, which are more focused towards blogs. This post will take a look at the Alexa Rank which has established itself as a popular and reliable website ranking system.
The Alexa Traffic Rank is derived from the website traffic data collected from millions of Internet users who have installed the Alexa Toolbar and also from other traffic sources. These data are analyzed over a moving three month period and therefore, the rank on any given date is based on the traffic data during the past three months.
The traffic rank is a combined measure of a website’s reach and page views. The reach is the percentage of all Internet users who visits a given site. If a website has a reach of 1%, it means that out of all users who browsed the Internet, 1% has visited that site. Page views are the total number of pages viewed by the visitors to a given site during the period of statistics calculation (i.e. three months).
The popularity of a site is inversely related to the rank number. A site with a lower rank number ranks better than a one with a higher rank number. In other words, the closer a rank gets to #1, the better that site is. Alexa considers the top 100,000 sites as the special ones out of the zillions of sites on the Internet and getting included in that list is quite an achievement.
The Alexa rank has gained a reputation as an important yard stick in measuring the value/worthiness of a website or a blog. This is especially important when it comes to website advertising. A site with a higher rank can enjoy better ad pricing among the advertisers and ad networks. If you are concerned about monetizing your site, then keeping an eye on, and working towards improving, your Alexa rank is a prudent thing.
Like most measurements, the Alexa rank is not a perfect gauge of the quality/popularity of a site. The sample size used by Alexa (which is several millions according to them), may not be representative of the entire Internet population. The Internet World Stats sites reports that, as of March 31st 2009, the total Internet users have gone beyond 1.5 billion! A sample of even 1% of such a massive population amounts to more than 15 million users. But, in the absence of perfect data, Alexa rank works as a formidable measure.
The rank of The Blogger Guide as of today is 430,987 and is nothing much to write home about. However, the three month change (i.e. the difference between the rank three months ago and that of today) shows a gain of over hundred thousand, which is a positive sign. This gain is in accordance with the growth in traffic seen over the same period.
For more information, see this FAQ page on the Alexa website and this good article on doshdosh.com.
Thursday, January 29, 2009
Blogger HOWTOs
Given below is a categorized list of HOWTOs available on The Blogger Guide.
Template Customizations
- How to Add a Third Column - clear and simple instruction to convert popular Blogger templates in to 3 columns
- How to Expand Post Width - easy to follow, step by step tutorials to widen the Blogger post column
- How to Add a Custom CSS to Blogger - tweak Blogger templates' look and feel with additional styles
- How to Customize Fonts and Colors - add your favorite fonts to Blogger
- How to Monitor Visitors - learn about visitor meters
- How to Exclude Your Visits from Google Analytics - tell Analytics to ignore internal traffic
- How to Exclude Your Visits from Feedjit - ignore internal traffic from Feedjit
- How to Add to Google Webmaster Tools - register your blog with GWT
- How to Add a Sitemap - help Googlebot to crawl your Blogger blog
- How to Get Spam Blog Cleared - contact Blogger support to unflag spam status
- How to Backup Your Template - learn to easily backup and restore your template
Saturday, March 29, 2008
Meta Tags FAQ
Meta tags are used to add additional information about the pages in a site/blog. A list of common questions and answers regarding meta tags are given below.
What is a meta tag?
What are the different types of meta tags?
How do I add one to my blog?
What is a meta tag?
The word meta carries the meaning about. For example, in database theory, the term metadata means data about data held in a database. Similarly, the meta tag carries information (or data) about the content in a web site or page.
The general format of a meta tag is:
<meta property value/>
where the property signifies the name of a property to which the meta tag relates and the value is the actual value taken by that property. The value of the meta tag is always provided using the content attribute.
What are the different types of meta tags?
Meta tags differ by the type of the property (see above question) they describe. These properties are defined using the following attributes of the meta tag. (Note: This is not a complete reference of the attributes. Only some of the commonly used ones are listed here)
name
The name attribute is used to define some of the most commonly used meta tags, namely, author, description and keywords.
- author - used to define the author of a web page
- description - used to provide a general description about a web page
- keywords - used to provide a list of keywords that the search engines can use in indexing a web page
<meta name="keywords" content="Blogger Tips, Blogger Guides, 3 Column Template Tips"/>
<meta name="description" content="A blog containing tips and guides on Blogger with clear and simple technical explanations"/>
http-equiv
This attribute provides another very commonly used functionality, redirecting. If used normally, it will only instruct the browser to refresh (i.e. reload) a page after a specified number of seconds. However, by providing an alternate URL, it is possible to load a different page when refreshing; i.e. a redirect is affected.
Reload the same page after 5 seconds:
Redirect to the given URL (specify 0 as time to affect an immediate redirect):
How do I add one to my blog?
The meta tags are added to the Blogger template. Go to the Edit HTML mode of your Layout editor and paste the meta tag after the <head> tag. See the figure below for an illustration of this step.

Reference:
Monday, March 17, 2008
HOWTO: Submit a Sitemap to Google Webmaster Tools
Update (Jan 2009):
This article explains the earlier interface of Sitemap submission. For the new simplified interface go here.
In a previous article we looked at how you can submit your site to Google Webmaster Tools (GWT). Once you submit your blog and verify your ownership to GWT, the next step is to add a sitemap.
Put in a simple way, a Sitemap is an XML file carrying the details of the posts in your blog. Because it is an XML file, computers (computer programs to be precise) find it easy to read it. Such files are also known as machine readable files. (Note, however, that the Sitemaps we refer to here are different from the human readable HTML pages that certain web sites carry, which guide the human visitors to all the pages on those sites). These Sitemaps are processed by search engine spiders such as the Googlebot, to discover the pages in web sites/blogs. Sitemaps are particularly useful to be used with blogs that have dynamic content. See the About Sitemaps help topic on GWT help center for more information on them.
The purpose of this article is to illustrate how to add a Sitemap of your blog to GWT. You can accomplish this by following the steps given below.
1) Login to GWT and click Sitemap -> Add for the relevant blog. (if you have submitted more than one blog, all of them will appear in your dashboard)
2) Choose General Site Map from the next screen.
3) Under the 3rd option which reads as My Sitemap URL is, type the following line.
feeds/posts/default?max-items=500&start-index=1
http://[your blog name].blogspot.com/feeds/posts/default is the default RSS feed for your blog. Since the RSS feed is an XML file, that can work as a Sitemap. The two parameters we provided in the above line instruct GWT to take 500 posts starting from the first post, as the content of this Sitemap. Later, if you want to add the second 500 posts, all you have to do is to add another Sitemap which looks like:
feeds/posts/default?max-results=500&start-index=501.
It is not a must to submit 500 posts at a time. It can be any number as long as the Sitemap does not exceed the limit of 50,000 URLs or 10MB in size.
4) Click Add General Site Map
You will see a confirmation page once the Sitemap is successfully added. Be a little patient until the Googlebot consumes this and build up the index for your blog. Remember, it can take well over a month for indexing to happen.
The following figure illustrates the 4 steps just described.
Sunday, March 9, 2008
HOWTO: Add your blog to Google Webmaster Tools
Google Webmaster Tools (GWT) is a service that helps you to see and control how Google sees your site/blog. It provides lot of statistics such as the index stats (i.e. what pages of your site are currently in Google's index), crawl stats etc. It lists various errors encountered by Googlebot while crawling your site. You can use it to submit sitemaps of your site to Google and also remove certain URLs of your site from the Google's index.
This article will illustrate how to add your blog to GWT and then verify it.
Add Site
Before you add a site you need to sign in to the service with a Google account. Then enter the URL of your blog's homepage and click Add Site.
Verify Site
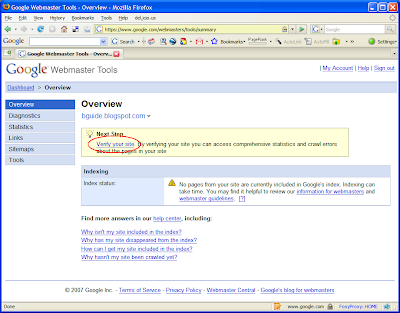
Once you add your blog, it will appear on your dashboard. Click on that and you will go the Overview page for your blog. As soon as you add it, the blog will be in the unverified state. Therefore you will see a message asking you to verify it. Verification is the process by which you confirm to GWT that you are the owner of this blog.
Click on Verify your site link.
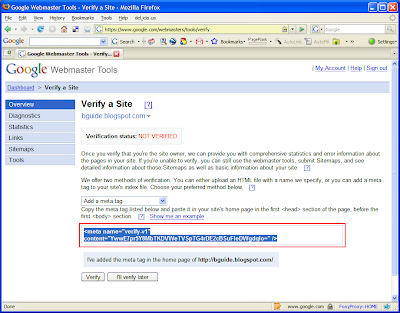
From the Verify a Site page, select Add a meta tag as the verification method.
You will then be presented with a meta tag. Copy the whole tag.
Go to your blog's Layout Editor and open the Edit HTML mode. Paste the meta tag you just copied immediately under the <head> tag. Save the template and go back to GWT.
Click on the Verify button.
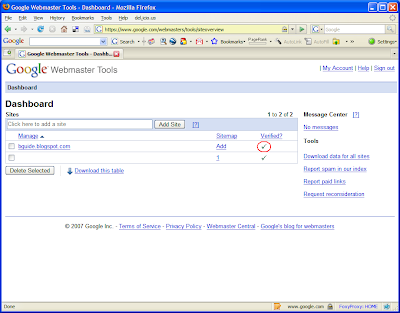
Go back to your dashboard and check whether the verification step is complete. (It might take a few minutes to get your status updated).
That's it. You have now added and verified your blog to GWT. Next step would be to submit a Sitemap to Google Webmaster Tools for Googlebot to start crawling your site.


