This article will explain how you can limit the appearance of a widget to a specific type of page on your blog.
For the purpose of explanation, I will use a widget from Feedjit, which we can use to guide visitors to popular pages on a blog. This particular widget will display the other pages read by previous visitors to a given page in your blog. It works similar to the Amazon’s “Customers Who Bought This Item Also Bought” recommendation. It is clear that this type of a widget is meaningless on your blog's homepage unless otherwise you have limited the number of posts on the homepage to one.
So let's see how we can limit this widget to only individual post pages or item pages. We use the conditional element or the <b:if>...</b:if> element for this purpose. The conditional element allows us to instruct Blogger to display some other element only if a given condition is true. Here's the general format of this element.
<!-- The element to be conditionally included goes here -->
</b:if>
The opening tag of the <b:if> element has an attribute called cond, meaning condition. The value that goes in to this attribute is a Boolean expression (don't worry, in simple English that means a check that turns out to be either true or false). If this expression evaluates to 'true', the element inside the <b:if> element will be included in the page rendered on a browser.
First step, obviously, is to add the widget as you would normally do. This widget will be installed using an HTML/Javascript element from the Layout editor. (Tip: Provide a Title for this widget. For example, I gave the title "Popular Pages" to the widget I used for this article. This is useful to locate the installed widget in our next step. You can remove the title later if you don't want it.)
Then we switch to the Edit HTML mode of the Layout editor and click on the Expand Widget Templates check box. (Always remember to back up your template, to restore if something goes wrong). Don't be overwhelmed by the expanded template; it's just like the unexpanded one but with more HTML. Now do a Find (Ctrl+F) for the Title we gave in the above step, inside the expanded template and locate the widget you just added.
This widget will be included as a <b:widget> element in the template. The widget has two parts; its title and the content. Locate the content part of the widget element and encompass that whole section inside a <b:if>...</b:if> element.
The important thing is the condition we provide here. We give the condition as cond='data:blog.pageType == "item"' instructing Blogger to display the content of this widget only if the pageType is equal to 'item'.
The final code snippet will look as follows.
<b:includable id='main'>
<!-- only display title if it's non-empty -->
<b:if cond='data:title != ""'>
<h2 class='title'><data:title/></h2>
</b:if>
<b:if cond='data:blog.pageType == "item"'>
<div class='widget-content'>
<data:content/>
</div>
</b:if>
<b:include name='quickedit'/>
</b:includable>
</b:widget>
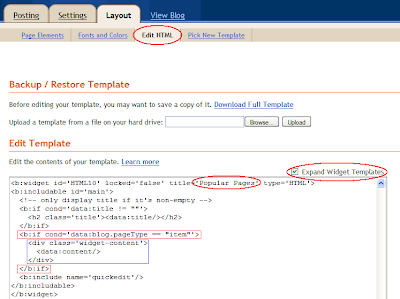
See the figure below for an illustration of this step.

The blue rectangle in the above figure shows the content section of the widget. The two red rectangles show the <b:if> element that we place enclosing the content section.
The same method can be used with the pageType set to 'index', to limit a widget to your blog's homepage.


