Showing posts with label Widgets. Show all posts

Sunday, January 31, 2010

Pages coming to Blogger!

Update: 2010 Feb 20
The pages feature has graduated from Blogger in Draft and now is a regular service.

It is just a little over a month ago that I wrote that we cannot have pages in Blogger. However, the test bed of Blogger, Blogger in Draft, has recently announced a pages feature in Blogger.

This, no doubt, will be an exciting news for most of the Blogger users out there. With pages one can easily create static pages such as About Us or Contact Us to hold information that don't change as often, but which needs to be easily accessed by visitors to a blog. This feature will be accompanied by a widget which helps to manage pages and display them easily either as a tabbed navigation bar or sidebar links.

It is still in beta stage and hopefully will be available in the primary Blogger service soon. You can try out the feature by logging in to draft.blogger.com.

Sunday, April 5, 2009

Post Date Header

The Date Header is that part of a Blogger blog which displays the date in which a post was created. This is sometimes referred to as the date stamp as well. We can easily control whether the Date Header should be displayed or not, and if displayed, in what format should it be displayed.

First let’s see how the appearance of the Date Header can be controlled. In Layout -> Page Elements view, if you open the Blog Posts widget in Edit mode, you get the Configure Blog Posts dialog. In that, the first check box under Selected Items is the button to ON/OFF the display of the Date Header. This is illustrated by the first red arrow in the figure below.


The format of the date stamp can be controlled from the drop down next to the check box mentioned above. However, it can also be set from the Settings -> Formatting section as shown below.


The Date Header is displayed only once for a given date. i.e., if you do more than one post per day, all of them will get only one date stamp when they are displayed on the blog’s main page. (Each of them, however, will have a date header on their individual post pages.) This is because the layout data tag (data tags are bits and pieces of information held in the Blogger database with respect to each blog) for the Date Header is set only once for all the posts in a given day.

This data tag is the post.dateHeader tag and this Blogger Help page says that it is “only present if this is the first post in the list that was posted on this day”.

Thursday, January 1, 2009

HOWTO: Add More Gadgets

First of all let me wish you a Happy New Year on this very first day of the year 2009. Today I will be presenting a simple, but useful tip on modifying your template to add more gadgets.

In a default Blogger template you can add gadgets only to the sidebars and the footer. For example, the following image illustrates the Page Elements view of a default Minima template.


As you can see, the “Add a Gadget” (or widgets as they are called sometimes) button is available only at the sidebar and the footer.

But these aren’t the only places where you can add gadgets in a Blogger template. With a simple modification of the template code, you can enable gadgets in several other sections. In this article we’ll see how.

If you view your template’s code using the Layout -> Edit HTML option, you can see several code elements enclosed in <b:section>…</b:section> tags. A b:section element defines a major section of your template such as the Header, Posts column etc. These elements have two optional attributes (or properties) called showaddelement and maxwidgets. The first property controls whether a given section should display the “Add a Gadget” button or not, and the maximum number of widgets for that section is defined by the second property.

For example, the default values for the Header section are as follows.

<b:section class='header' id='header' maxwidgets='1'
showaddelement='no'>

Gadgets in the Header section can be enabled by simply changing the value of the showaddelement property to ‘yes’. Absence of the maxwidgets property implies that there is no maximum limit, so removing that property is the easier thing to do.

Therefore, by changing the above code line to this:

<b:section class='header' id='header' showaddelement='yes'>

your Page Elements view will change to the following.


The cross column (an invisible, horizontal column separating the Header and the content columns) and the Posts column are two other sections that can be modified as above, giving you more options in placing gadgets. The following code snippets display the beginning of those two sections respectively.

<b:section class='crosscol' id='crosscol' showaddelement='no'/>

<b:section class='main' id='main' showaddelement='no'>

Sunday, November 30, 2008

Blog Widget - Part 5

Finally, in the fifth article of this series, we arrive at the core includable of the Blog widget, the post includable. So far, we've had an overview of the Blog widget, looked at the status-message, comments and next/previous posts sections. What's remaining to be addressed is the post section.

This is what controls the appearance of the most critical content of a Blogger blog, the posts. If you open your template in Edit HTML mode and click on the ‘Expand Widget Template’ checkbox, you can see the post includable defined as follows.

<b:widget id='Blog1' locked='true' title='Blog Posts' type='Blog'>

<b:includable id='post' var='post'>
</b:includable>


</b:widegt>

The <b:widget> section with the type=’Blog’ is the entire Blog widget and inside that, what goes in between <b:includable id='post' var='post'> and </b:includable> is the post includable.

First, let’s see the main sub sections of this includable, illustrated by the figure below.


The outer most element is the post hentry section. This is divided in to three sub elements, namely, the post title, the post body and the post footer. The post footer is in turn divided in to three more sub elements.

The above abstracted diagram is of little use. To make the real connection between all these code and an actual blog post, let’s map them on to a real blog post. The following illustration is just that.


The above figure overlays few rectangular regions on top of a screenshot of an actual blog post. The post title and post body sections are visible clearly. It is the post footer and its sub sections that are not so prominent. It should be now clear to you that the author name, time stamp, labels etc. that appear at the bottom of a post are in fact contained in the post footer section.

For example, the display of post labels is handled by this piece of code.

<div class='post-footer'>

<div class='post-footer-line post-footer-line-2'>
<span class='post-labels'>
<b:if cond='data:post.labels'>
<data:postLabelsLabel/>
<b:loop values='data:post.labels' var='label'>
<a expr:href='data:label.url' rel='tag'><data:label.name/></a><b:if cond='data:label.isLast != "true"'>,</b:if>
</b:loop>
</b:if>
</span>
</div>

...
</div>

The post-footer-line-3 is empty by default.

After a long series of articles (that spanned about 5 months due to time constraints) about the Blog widget, I assume that you are now confident enough to look under the hood to explore the structure of the Blog widget. Go ahead and take peak at the widget’s code.

Finally, you might ask, “What’s the use of knowing this anyway?”. Though for the most part you don’t have to meddle with the code underneath, knowledge of what controls the display of your posts can become handy when things go wrong sometimes. For example, see this thread on the Blogger Help Group where one blogger had a problem of missing the Next Previous post links from his blog and how it could be corrected by adding the missing ‘include’ statement for that section.

Saturday, October 25, 2008

Blog Widget - Part 4

The Blog Widget is what controls all the posts and their comments in Blogger blogs. Hence, it is obviously the most important widget in Blogger.

This is the fourth in a series of articles covering the details of the Blog widget. In part three, we studied the comments section and in this one, we will dig in to the details of the next, previous posts and feed subscription links. These are the links that appear at the bottom of the posts column.


The above figure shows a typical display of these links at the end of the posts on a given page.

The light blue shading shows the area in which Newer Posts and Older Posts links appear. The behavior of this section is defined by the includable section with the id nextprev. It optionally contains a link to the blog’s home page when viewing pages other than the home page.

The feedLinks includable, highlighted in orange, is what displays the “Subscribe to:” link. When the blog’s home page is viewed, this section displays the link to the posts feed and in individual pages, it carries the post comments feed link.

The illustration above has a mapping of the actual includable sections in the Blogger template to how they are visually displayed when a blog is loaded in a browser window. That should help the more curious readers to open their templates in Edit HTML mode and investigate further.

So far we have covered all the major sections of the Blog Widget other than the most crucial section; i.e. the main includable. Let’s have a go at that in the next article.

Tuesday, July 1, 2008

HOWTO: Add a Recent Posts Feed

If you want to add a feed that shows your Recent Posts in the sidebar, you can use the BuzzBoost feature from FeedBurner (www.feedburner.com). It is very simple.

First, burn your feed at FeedBurner. Then go to your feed's homepage on FeedBurner and click the Publicize tab. From that section select BuzzBoost. (See figure below)


Configure the number of posts to display and the content to appear and then copy the given Javascript code. Add it to your blog using an HTML/Javascript widget. (You can alternatively use the "Use as a widget in" option provided on the BuzzBoost page. This will take you to the "Import Page Element" page of Blogger.)

That's it. View your blog and you will see the recent posts appearing on your sidebar.

Saturday, June 14, 2008

Blog Widget - Part 3

This is the third in a series of articles about the Blog Widget, the most important widget in Blogger. First article was an overview of the widget and the second was about the status-message section.

In this part, we are going to take a look at the comments section.

If you open your template in HTML mode (i.e. Layout -> Edit HTML) and click on the Expand Widget Templates button, you can see the following code that encloses the comments section.

<b:includable id='comments' var='post'>
...
</b:includable>

Everything about how to display the comments in a given post is described within the above includable section. This section is then included inside the main section as shown in red below.

<b:includable id='main' var='top'>
<!-- posts -->
<div class='blog-posts hfeed'>

<b:include data='top' name='status-message'/>

<data:adStart/>
<b:loop values='data:posts' var='post'>
<b:if cond='data:post.dateHeader'>
<h2 class='date-header'><data:post.dateHeader/></h2>
</b:if>
<b:include data='post' name='post'/>
<b:if cond='data:blog.pageType == "item"'>
<b:include data='post' name='comments'/>
</b:if>

...
</b:includable>

Notice that the comments section is enclosed in a <b:if> element. What it says is to show the comments section only if the pageType is equal to item. This is why we don’t see the comments in the blog’s homepage or archive pages. The default setup is to show comments only in the individual post pages.

Now let’s get to the internals of the comments section. Before looking at the code, see the following illustration to understand the sub sections of the comments section.
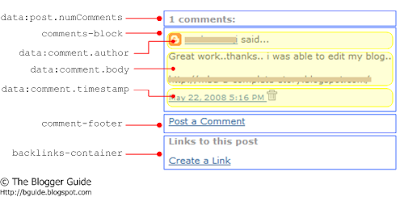

The above figure has the regions of a screenshot of an actual comments section marked out, helping you to make the connections easily. As you can see, right on top is the numComments sub section showing the number of comments.

Next is the comments-block, which in turn is divided in to 3 parts; comment author, comment body and timestamp. The light yellow shading in the above figure highlights these 3 sub sections. The names of these 3 sub sections are self explanatory. comment-block section repeats the author, body and timestamp sub sections for every comment in a given post.

An important thing to note inside the timestamp sub section is the commentDeleteIcon, shown in red below. (This is one of the includables we discussed in part 1 of this series.).

<span class='comment-timestamp'>
<a expr:href='data:comment.url' title='comment permalink'>
<data:comment.timestamp/>
</a>
<b:include data='comment' name='commentDeleteIcon'/>
</span>

This is the small trash can icon you see next to the timestamp in the above figure and it is displayed only when the blog’s admin is logged in. We will take a detail look at the commentDeleteIcon section later in this series.

Following the comments-block (i.e. after displaying all the comments) is the comment-footer which carries the Post a Comment link.

And finally is the back links section, which displays any other blog posts that link to the post in concern. The backlinks-container in turn includes the backlinks section, another includable of the Blog Widget.

That’s it. Hope you are now clear about the comments section of the Blog Widget. Did I manage to explain the somewhat complex code in this part clear enough? Let me know what you think.

Note:
One sub section I didn’t mention is the paging-control-container, which will break the display of the comments, over several “pages”. This will come in to play once the number of comments reaches a particular maximum number per page. However, I was not able to figure out what that maximum is and none of my posts have reached a level where the comment paging has taken place. If you do know that maximum number of comments per page, let me know.

Wednesday, June 4, 2008

Blog Widget - Part 2

In the previous article of this series, we had an overview of the Blog widget covering its basic components. In that article, we learned the main includables and their order of inclusion.

In this article we will take a look at the status-message includable.

If you open your template in HTML mode (i.e. Layout -> Edit HTML) and click on the Expand Widget Templates button, you can see the following code that defines the status-message section.

<b:includable id='status-message'>
<b:if cond='data:navMessage'>
<div class='status-msg-wrap'>
<div class='status-msg-body'>
<data:navMessage/>
</div>
<div class='status-msg-border'>
<div class='status-msg-bg'>
<div class='status-msg-hidden'><data:navMessage/></div>
</div>
</div>
</div>
<div style='clear: both;'/>
</b:if>
</b:includable>

And this particular section will be included in the main section as follows.

<b:includable id='main' var='top'>
<!-- posts -->
<div class='blog-posts hfeed'>

<b:include data='top' name='status-message'/>

...
</b:includable>

This section, however, is not a very important part of the Blog widget. There are two instances in which this section comes in to play; when someone searches your blog using the Search box in the Navigation Bar or clicks on one of the Labels.

For example, if some searches for the string "text widget", the status message will be displayed as follows.


So that's the status-message section of the Blog widget.

Tuesday, June 3, 2008

Blog Widget - Part 1

The Blog Widget is the most important widget in Blogger. It contains the core content of a blog including its posts, comments, back links and feed links. In other words, this is what defines the composition of the main column of a Blogger blog.

Knowing the finer points of the Blog widget is very valuable to any Blogger user. Since it is so important, I'm going to explain this widget over several articles. This is the first part of a multi part article series on the Blog widget.

As with any widget, the Blog widget also has a primary <b:includable> section with an id='main'. However, it also contains a number of other <b:includable> sections, each serving a valuable purpose. They are:

  • status-message
  • post
  • postQuickEdit
  • comments
  • commentDeleteIcon
  • backlinks
  • backlinkDeleteIcon
  • nextprev
  • feedLinks
  • feedLinksBody
These includables are the building blocks of the Blog widget. If we equate the Blog widget to a car, think of the main includable as the chassis and the others as various components such as the body, engine, seats etc. of that car. The final Blog widget is the result of assembling these includables in a particular order. This hierarchy of assembly is illustrated in the figure below.


At the first level of inclusions in the main section are the status-message, post, comments (only in item pages), nextprev and feedLinks sections. The post section in turn includes the postQuickEdit section. commentDeleteIcon and backlinks sections are contained within the comments section and the backlinks section in turn includes the backlinkDeleteIcon section. Finally, the feedLinks contains the feedLinksBody section.

In the articles to follow, we will probe each of these includable sections one by one.

Sunday, June 1, 2008

Widget Instantiation

The template is a crucial element of the new Layout Blogger blogs. It defines the arrangement of the main post column and the sidebar, layout of blog elements such as the posts, widgets, headers etc. and also the fonts and colors of its look and feel. Understanding the template is, therefore, very useful in understanding how your blog behaves.

In two previous articles we looked at the primary components and the basic skeleton of a Blogger template. In this article, we will dig in to the more specific topic of widgets. More precisely, we are going to see how widgets get instantiated.

Instantiation has a very specific meaning in a technical context. In programmers' jargon, it means creating a specific instance from a generic template. In laymen terms, think of a template as a mould and instantiation as the act of moulding out a shape from that mould. So, the widget we see in the template is the mould and when the blog is actually viewed in a browser window, what we see is the moulded shape (or the instantiated widget).

Let's look at an example to be more clear about this instantiation process.

Consider a simple Text widget with a title and some sample text in its body. If you go to Layout -> Edit HTML, all you see as your widget is a single line similar to the one shown below.

<b:widget id='Text1' locked='false' title='Test Widget' type='Text'/>

If you click on the Expand Widget Templates check box, the above single line will be expanded to the complete widget shown below.

<b:widget id='Text1' locked='false' title='Test Widget' type='Text'>
<b:includable id='main'>
<!-- only display title if it's non-empty -->
<b:if cond='data:title != ""'>
<h2 class='title'><data:title/></h2>
</b:if>
<div class='widget-content'>
<data:content/>
</div>
<b:include name='quickedit'/>
</b:includable>
</b:widget>

The 4 lines shown in blue instructs Blogger to include the title of this widget if the title is not empty. The key thing to note is the absence of the actual title here. What the template has is the XML element <data:title/>. Similarly, the 3 lines shown in red represent the body of the widget using the XML element <data:content/>. The line in green is what embeds the code needed for the Quick Edit (i.e. Screwdriver and Wrench icon you see when you are logged in to your blog) function.

<data:title/> and <data:content/> are special instructions to Blogger. When the blog actually loads up in a browser (i.e. when someone visits your blog),these two XML elements get replaced with the actual title and the content, fetched from the Blogger database.

Once the above widget is instantiated, the resulting HTML code you see is as follows.

<div class='widget Text' id='Text1'>
<h2 class='title'>Test Widget</h2>
<div class='widget-content'>
This is to a sample text widget.
</div>
<div class='clear'></div>
<span class='widget-item-control'>
<span class='item-control blog-admin'>
<a class='quickedit' href='http://www.blogger.com/rearrange?... title='Edit'>
<img alt='' src='http://www.blogger.com/img/icon18_wrench_allbkg.png'/>
</a>
</span>
</span>
<div class='clear'></div>
</div>

Here are the key changes.
  • The <b:widget> element is replaced with an HTML div element.
  • <b:includable> and <b:if> elements are not present
  • <data:title/> is replaced with the actual title "Test Widget"
  • <data:content/> is replaced with the actual content "This is to a sample text widget."
  • The quickedit line has stuffed in all the code needed to affect that behavior
If the widget title was empty, you will not see the blue line in the resulting HTML code.

This is how most of the widgets you see in Blogger get instantiated. The Blog widget, however, has some complex instantiation and we will take a look at it in another article.

Saturday, May 17, 2008

The Text Widget


The Text widget is one of the simplest widgets available on Blogger.


You can provide a title for your widget (Label 1) and type some descriptive text in its body (Lable 2). There is a Rich Text editor (Lable 3) which allows you to apply some basic formatting such as bold face, font colors from a toolbar. The toolbar has a button to add hyperlinks as well.

If you know HTML, there is an Edit HTML mode (Label 4) which gives you more options for formatting text. Using this mode, for example, you can underline text, which you can't do using the toolbar. (See figure below for an illustration of that)


Possible Uses

  • Display an About description specific for a blog (Profile widget cannot do this. It will display the same About in all of your blogs)
  • Display some common message such as a Disclaimer on all your blog pages

Tuesday, May 13, 2008

Blogger Widgets

Widgets are the add-ons to your blog. Some of the widgets such as Blog, Archive and Header come by default when you select a template. Also there are many other different types of widgets offered by Blogger that you can plug in using the Add Page Element option in your Layout editor.

This is an article series that will cover the details about the different types of widgets available on Blogger and their possible uses. In each of the articles in this series, you will find simple illustrations of those widgets as well as the finer details about them.

The currently available widgets are:

  • Text
  • Blog
  • Archive
  • Profile
  • Labels
  • HTML/Javascript
  • List
  • Link List
  • Header
  • Picture
  • Slideshow
  • AdSense
  • Feed
  • Newsreel
  • Video Bar
  • Logo
Last Updated: 2008 May 17

Tuesday, March 4, 2008

Dynamic Tree Control for Blogger

A tree control (i.e. the GUI element found in the left pane of Windows Explorer) provides a useful way of organizing a set of hierarchical items. This article will present a method to incorporate such a tree control in to Blogger blogs.

Before we proceed, let's take a look at how our final tree will look like.


Now let's see how to include a tree like the above in your blog.

Step 1
First step is to include two resources, a JavaScript file and a CSS file, in to the Blogger template. Copy the following two lines of code and insert them in to the head section of your template.


<link href='http://idssl.fileave.com/tbg/dtree.css' rel='StyleSheet' type='text/css'/>
<script src='http://idssl.fileave.com/tbg/dtree.js' type='text/javascript'/>

You can copy it immediately under the <head> tag as shown in the figure below. (These two resources are hosted on a free file hosting service. Don't worry, there is no tracking code or any thing of that sort there.)


Save your template and exit Edit HTML mode.

Step 2
Next step is to write the code necessary to create the tree. I will first present a sample code and then explain it.

<div class="dtree">

<p><a href="javascript: d.openAll();">open all</a> | <a href="javascript: d.closeAll();">close all</a></p>

<script type="text/javascript">
<!--

d = new dTree('d');

d.add(0,-1,'Favorite Articles');
d.add(1,0,'3 Columns');
d.add(2,1,'3 Columns Explained','http://bguide.blogspot.com/2008/02/three-column-templates-explained.html');
d.add(3,1,'Skeleton of a Template','http://...');
d.add(4,1,'Adding a Third Column','http://...');
d.add(5,1,'Layout Wire Frame Editor','http://...');
d.add(6,1,'3 Columns with LR Sidebars','http://...');
d.add(7,0,'Blog Traffic');
d.add(8,7,'How to Monitor Visitors','http://...');
d.add(9,7,'Feedjit','http://...');
d.add(10,7,'Exclude Your Traffic from GA','http://...');
d.add(11,0,'Customizations');
d.add(12,11,'Add a Custom CSS class','http://...');
d.add(13,11,'Related Posts Table','http://...');
d.add(14,11,'Limit Widgets to Specific Pages','http://...');
d.add(15,1,'3 Column Step by Step Guides','http://...');

document.write(d);

//-->
</script>
</div>

The first line defines a generic div element and applies the class dtree in to that. This CSS class is defined in the dtree.css file which we included in Step 1 above. Next line inserts two buttons (in fact, links) to Expand and Collapse all the nodes in the tree. Thirdly, you find a Javascript enclosed within a <script> element. The first line in the script, d = new dTree('d'), creates a new tree object to which we can insert nodes. The following lines which start with d.add(...) are the statements that insert all the nodes in to the tree. Then the last line of the script, document.write(d), renders the created tree on to the browser.

The add() function of the dTree takes in several parameters. The first 3 parameters are required (i.e. you must provide values for them) and the other parameters are optional. The above example uses the following 4 parameters.
  • Node ID - A unique numerical ID number. Assign a sequentially increasing number to each new node.
  • Parent Node ID - If you want to create a child node, then the ID of the parent node should be given here. This will be '-1' for the root node. (See the first d.add(...) line in the example)
  • Node Name - A textual description for the node
  • Node URL - If you want the node to link to some resource (e.g. an HTML page or some online image), provide the URL of the that resource as the 4th parameter.
For a full description of the add() function see here.

You don't have to provide consecutive (or adjacent) IDs for all the child nodes at a given level. For example, node 15 of the above snippet is attached as a child of node 1 called '3 Columns'. You can have the nodes anywhere as long as you maintain the uniqueness of the node IDs and provide the correct parent node IDs.

Step 3
Once you finish adding the nodes, copy the entire code starting from the <div class="dtree"> to the corresponding </div>. Then insert the entire code using an 'Add HTML/Javascript Element' widget of the 'Add Page Element' window.

Place the widget where you want the tree to appear. Save the template and view your blog. You will have the tree sitting nicely in your blog!

If the entry names are longer than the width of the widget, it will get an automatic horizontal scroll bar. To stop having to scroll horizontally give names that fit withing the width of the containing sidebar (or whatever location). Let me know what you think of it and also if you come across any problems when installing it.

Acknowledgment:
I have used the free tree control offered by Geir Landrö at Destroydrop. The original files have been slightly modified to make them available online, to be used inside Blogger.

Note:
You are free to use the resources used in Step 1. But if you do use, please link to this article from your blog.

Saturday, March 1, 2008

Limiting Widgets to Specific Pages

This article will explain how you can limit the appearance of a widget to a specific type of page on your blog.

For the purpose of explanation, I will use a widget from Feedjit, which we can use to guide visitors to popular pages on a blog. This particular widget will display the other pages read by previous visitors to a given page in your blog. It works similar to the Amazon’s “Customers Who Bought This Item Also Bought” recommendation. It is clear that this type of a widget is meaningless on your blog's homepage unless otherwise you have limited the number of posts on the homepage to one.

So let's see how we can limit this widget to only individual post pages or item pages. We use the conditional element or the <b:if>...</b:if> element for this purpose. The conditional element allows us to instruct Blogger to display some other element only if a given condition is true. Here's the general format of this element.

<b:if cond="the condition to be checked" >

<!-- The element to be conditionally included goes here -->

</b:if>


The opening tag of the <b:if> element has an attribute called cond, meaning condition. The value that goes in to this attribute is a Boolean expression (don't worry, in simple English that means a check that turns out to be either true or false). If this expression evaluates to 'true', the element inside the <b:if> element will be included in the page rendered on a browser.

First step, obviously, is to add the widget as you would normally do. This widget will be installed using an HTML/Javascript element from the Layout editor. (Tip: Provide a Title for this widget. For example, I gave the title "Popular Pages" to the widget I used for this article. This is useful to locate the installed widget in our next step. You can remove the title later if you don't want it.)

Then we switch to the Edit HTML mode of the Layout editor and click on the Expand Widget Templates check box. (Always remember to back up your template, to restore if something goes wrong). Don't be overwhelmed by the expanded template; it's just like the unexpanded one but with more HTML. Now do a Find (Ctrl+F) for the Title we gave in the above step, inside the expanded template and locate the widget you just added.

This widget will be included as a <b:widget> element in the template. The widget has two parts; its title and the content. Locate the content part of the widget element and encompass that whole section inside a <b:if>...</b:if> element.

The important thing is the condition we provide here. We give the condition as cond='data:blog.pageType == "item"' instructing Blogger to display the content of this widget only if the pageType is equal to 'item'.

The final code snippet will look as follows.

<b:widget id='HTML10' locked='false' title='Popular Pages' type='HTML'>
<b:includable id='main'>
<!-- only display title if it's non-empty -->
<b:if cond='data:title != ""'>
<h2 class='title'><data:title/></h2>
</b:if>
<b:if cond='data:blog.pageType == "item"'>
<div class='widget-content'>
<data:content/>
</div>
</b:if>
<b:include name='quickedit'/>
</b:includable>
</b:widget>


See the figure below for an illustration of this step.


The blue rectangle in the above figure shows the content section of the widget. The two red rectangles show the <b:if> element that we place enclosing the content section.

The same method can be used with the pageType set to 'index', to limit a widget to your blog's homepage.

Monday, February 18, 2008

Feedjit – Real time Web Traffic

Feedjit offers an exciting set of widgets to monitor the traffic to your blog or web site in real time. They are very lightweight and easy-to-install widgets and you can set up them in no time.

There are two main types of widgets.

  • Widgets that show Live Traffic
  • Widgets that help to guide your visitors to the best content in your site
Traffic Widgets
The traffic widgets either show a list or a map overlay of recent visits. The map widget is a miniature version and clicking on it will give you an expanded view of the same data.

The list view gives the city, country, and the source page of the incoming visitors and lists the last 10 visits.


The expanded map view which is an overlay over Google Maps shows the last 100 visits by country, and clicking on a given visit will show you the pages viewed from that visit.


Content Widgets
There are two content widgets; one that shows a Recommended Reading List and another which shows Page Popularity.

The Recommended Reading List is a good way to minimize your bouncing rate (i.e. visitor who leave your site from the page they entered itself) and the recommendations are derived from the viewing of past visitors. It is similar to Amazon’s “Customers Who Bought This Item Also Bought” recommendation.

The Page Popularity widget lists the 10 most read articles in your site and offers an effective method of guiding your visitors to your best content.

Once you install a widget you get a separate stats area for your site or blog in the Feedjit’s main site. The expanded map view of your site is available from this stat area.

Installing a widget is really simple. Blogger and Typepad users can do it with a single click.


Clicking on the Blogger button will take you to Blogger’s Import Page Element page and once you click ADD WIDGET it’s in your blog. Alternatively you can copy the Javascript and add it using Blogger’s add HTML/JavaScript element feature.

Compared to Google Analytics (GA), the Feedjit widgets are much simpler and easy to use. They offer you real time traffic updates whereas GA is updated once a day. GA offers a far more advance and comprehensive set of statistics but if you simply want to keep track of visitors to your site, Feedjit is ideal. What's more you can easily filter out your own visits to the blog at the click of a button. So you can track the actual external visitors, which is a real plus. You can also customize the color scheme and width of each widget to match your site.