Showing posts with label Webmaster Tools. Show all posts

Monday, January 19, 2009

Simplified Sitemap Submission

Recently Google Webmaster Tools (GWT) simplified the interface for Sitemap submission. As illustrated in this article, Sitemap submission earlier involved the selection of a file type. The new simplified interface, however, eliminates that need, giving us one factor less to worry about.

Login to GWT and go to Sitemaps -> Overview. Enter the path of your Sitemap file, relative to your blog's root, in the given text field and click Submit Sitemap. For Blogger blogs, the default RSS feed can be used as the Sitemap. Given below is relative path of such a feed.

feeds/posts/default?max-items=500&start-index=1

http://[your blog name].blogspot.com/feeds/posts/default is the default RSS feed for your blog. Since the RSS feed is an XML file, that can work as a Sitemap. The two parameters we provided in the above line instruct GWT to take 500 posts starting from the first post, as the content of this Sitemap. Later, if you want to add the second 500 posts, all you have to do is to add another Sitemap which looks like:

feeds/posts/default?max-results=500&start-index=501

It is not a must to submit 500 posts at a time. It can be any number as long as the Sitemap does not exceed the limit of 50,000 URLs or 10MB in size.

Once submitted GWT will automatically determine the Sitemap type and then start processing it. The figure below illustrates this new interface.

Thursday, January 15, 2009

How Visitor Tracking Works

If you maintain a blog or a website, then it is most likely that you want to find out who is visiting that blog/site. The most common and easiest approach to monitor the visitors is to install a visitor meter. There are many free visitor meters (trackers or counters as they are called sometimes) available today, and almost all of them work based on some Javascript and/or HTML based tracking code invoked from the client-side. (The other primary method of visitor tracking is server-side log analysis). In this article, we'll take a brief look in to how these tracking systems work.

When you sign-up with one of these tracking services, you get a piece of code typically called the tracking code. Then you have to install that in all the web pages you wish you track. In the case of Blogger blogs, an HTML/Javacript widget can be used to embed this tracking code to your blog. As Blogger widgets load up on all blog pages (unless you limit them to specific pages), that way you can easily track your entire blog, even the posts that you write in the future. Given below is the tracking code for this blog provided from Site Meter.

<!-- Site Meter -->
<script type="text/javascript" src="http://s44.sitemeter.com/js/counter.js?site=s44idssl">
</script>
<noscript>
<a href="http://s44.sitemeter.com/stats.asp?site=s44idssl" target="_top">
<img src="http://s44.sitemeter.com/meter.asp?site=s44idssl" alt="Site Meter" border="0"/></a>
</noscript>
<!-- Copyright (c)2006 Site Meter -->

In the above code, the <script> element refers to a Javascript (type="text/javascript") named counter.js located at http://s44.sitemeter.com/js/. When someone visits a page in The Blogger Guide blog, that visitor's browser will execute this Javascript code, by passing the argument site=s44idssl in to it. This argument carries the codename (or ID) given for this blog by Site Meter. The code inside the <noscript> element comes in to play when the visitor's browser has Javascript disabled or has no support for Javascript.

Once installed, this tracking code does two things every time a tracked page loads up. Firstly, it will fetch the relevant Javascript code from the tracking service's web server and execute it. When this script executes, it will gather data such as the referrer to the web page (i.e. from which page did the visitor reach your tracked page), visitors IP, the ISP, browser type, OS, screen resolution etc. The collected data will be sent to the tracking service, piggybacked on another HTTP request. This second request is typically to download some web resource such as a dummy image (e.g. a transparent 1x1 px image) or an image showing the cumulative total of visitors. Given below is such a request sent to Site Meter when a page from this blog loads up.

http://s44.sitemeter.com/meter.asp
?site=s44idssl
&refer=http://groups.google.com/group/…
&ip=124.43.143.75
&w=1680
&h=1050
&clr=32
&tzo=-330
&lang=en-US
&pg=http://bguide.blogspot.com/
&js=1
&rnd=0.16926656137301965

Note that all this data are sent in a single line. The line breaks are added for clarity. The request shown above is sent to a web page called meter.asp, located at http://s44.sitemeter.com. The &refer parameter says that the visitor has reached from a link via a Google Groups page. An application running on the tracking service's web server will extract the data sent via the request and will populate their database. It is this data that you see in various summarized forms when you later login to see the visitor statics.

Another common requirement of bloggers/webmasters is to exclude their own visits to the blogs/sites maintained by them. Chances are that you will visit your blog many times a day and you don't want them counted as actual visits. Most tracking services offer a simple cookie-based method of achieving that. For instance, in Site Meter's, the ignore visits option in the manager section offers a simple one click method of excluding own visits. Feedjit also has a similar simple method. However, it is not that simple in certain services (e.g. Google Analytics). (See this article to learn how to exclude your visits from Google Analytics)

Sunday, May 25, 2008

Understanding the robots.txt File

The robots.txt file is useful in blocking off some of the pages of your blog/site from search engine crawlers. In this article, we will take a look at some of the commonly asked question about the robots.txt file, with a particular focus on Blogger blogs.

The questions are ordered with a logical flow so that you can read them from top to bottom as well.


What is a Robot?
A Robot (aka wanderer, crawler or spider) is a computer program that traverses the web automatically.

Even though these names give you the feeling that these programs “travel around” the Internet, they really don’t travel from computer to computer. What they, in fact, do is to follow the hyperlinks found on web pages by issuing download requests for each of those hyperlinked pages.

Crawling, however, is a separate topic that falls beyond the scope of this article.

What is the robots.txt file?
This is a simple ASCII text file and its name must be written in all lowercase letters as robots.txt. It should be located at the root directory of your domain. Usually, in a website, this is where you keep your index.html file.

In Blogger blogs, this is located at the following address.

http://<your-blog-name>.blogspot.com/robots.txt

For example, if your blog name is my-great-blog, then your robots.txt file can be viewed by typing the following address in to browser’s address bar.

http://my-great-blog.blogspot.com/robots.txt

What is the format of this file?
A typical robots.txt file consists of one or more sets of rules or directions for search engine robots. Each set of rules comprises of two or more instructions written on adjacent new lines. Rule sets are separated by blank new lines.

Here’s a typical example file from a blogspot blog. (Line numbers are added for referencing only. The actual file does not contain them)

1: User-agent: Mediapartners-Google
2: Disallow:
3:
4: User-agent: *
5: Disallow: /search

Lines 1 & 2 form one set of rules and lines 4 & 5 form another set. They are separated by the blank line 3.

A typical rule set starts with a User-agent: line which identifies one or more robots. Then it will have one or more Disallow: [or Allow:] commands, in separate, adjacent new lines.

For example, in the second rule set above:
  • User-agent: * - means all user agents
  • Disallow: /search - means “don’t crawl any URL that starts with http://.blogspot.com/search/…. In Blogger, this rule will block off all Labels. It’s added by default, because the Label pages just display the individual pages belonging to that label, which the robots will anyway find while crawling the rest of the site.

For more details see:

What is the use of the robots.txt file?
As you’ve probably realized by now, the robots.txt file is used to prevent robots from crawling certain areas of your site/blog.

However, remember that not all robots respect this file. For example, spam bots, which scan the web to steal email addresses, can ignore the Disallow: commands and enter those pages. So the robots.txt file is not a good way to hide your secure information.

Can I edit the robots.txt file?
Unfortunately, Blogger users cannot edit their robots.txt file. It is maintained by Blogger itself and you cannot upload your own file instead of the default one.

But, if you manage a site where you can upload files to the root domain, then you can use the tools provided by the Google Webmaster Tools (GWT) console to edit the robots.txt file. Once you have verified your blog with GWT, this is available from the Tools section of the left side navigation bar.


The Analyze robots.txt tool lets you test your rules to see what URLs they actually allow or disallow. This is good to avoid any un-intentional block offs by syntax errors in your file.

The Generate robots.txt tool has a simple user interface to create a file, even if you are not sure of the file’s syntax. Once generated, you can download the file to your machine and then upload it to your site’s root domain.

Monday, March 17, 2008

HOWTO: Submit a Sitemap to Google Webmaster Tools

Update (Jan 2009):
This article explains the earlier interface of Sitemap submission. For the new simplified interface go here.

In a previous article we looked at how you can submit your site to Google Webmaster Tools (GWT). Once you submit your blog and verify your ownership to GWT, the next step is to add a sitemap.

Put in a simple way, a Sitemap is an XML file carrying the details of the posts in your blog. Because it is an XML file, computers (computer programs to be precise) find it easy to read it. Such files are also known as machine readable files. (Note, however, that the Sitemaps we refer to here are different from the human readable HTML pages that certain web sites carry, which guide the human visitors to all the pages on those sites). These Sitemaps are processed by search engine spiders such as the Googlebot, to discover the pages in web sites/blogs. Sitemaps are particularly useful to be used with blogs that have dynamic content. See the About Sitemaps help topic on GWT help center for more information on them.

The purpose of this article is to illustrate how to add a Sitemap of your blog to GWT. You can accomplish this by following the steps given below.

1) Login to GWT and click Sitemap -> Add for the relevant blog. (if you have submitted more than one blog, all of them will appear in your dashboard)

2) Choose General Site Map from the next screen.

3) Under the 3rd option which reads as My Sitemap URL is, type the following line.

feeds/posts/default?max-items=500&start-index=1

http://[your blog name].blogspot.com/feeds/posts/default is the default RSS feed for your blog. Since the RSS feed is an XML file, that can work as a Sitemap. The two parameters we provided in the above line instruct GWT to take 500 posts starting from the first post, as the content of this Sitemap. Later, if you want to add the second 500 posts, all you have to do is to add another Sitemap which looks like:

feeds/posts/default?max-results=500&start-index=501.

It is not a must to submit 500 posts at a time. It can be any number as long as the Sitemap does not exceed the limit of 50,000 URLs or 10MB in size.

4) Click Add General Site Map

You will see a confirmation page once the Sitemap is successfully added. Be a little patient until the Googlebot consumes this and build up the index for your blog. Remember, it can take well over a month for indexing to happen.

The following figure illustrates the 4 steps just described.

Sunday, March 9, 2008

HOWTO: Add your blog to Google Webmaster Tools

Google Webmaster Tools (GWT) is a service that helps you to see and control how Google sees your site/blog. It provides lot of statistics such as the index stats (i.e. what pages of your site are currently in Google's index), crawl stats etc. It lists various errors encountered by Googlebot while crawling your site. You can use it to submit sitemaps of your site to Google and also remove certain URLs of your site from the Google's index.

This article will illustrate how to add your blog to GWT and then verify it.

Add Site
Before you add a site you need to sign in to the service with a Google account. Then enter the URL of your blog's homepage and click Add Site.


Verify Site
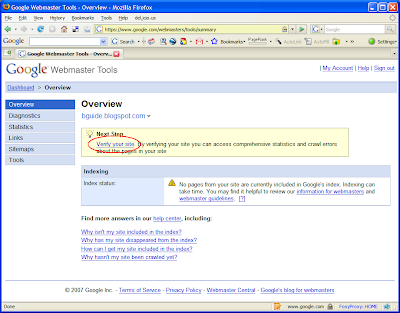
Once you add your blog, it will appear on your dashboard. Click on that and you will go the Overview page for your blog. As soon as you add it, the blog will be in the unverified state. Therefore you will see a message asking you to verify it. Verification is the process by which you confirm to GWT that you are the owner of this blog.

Click on Verify your site link.


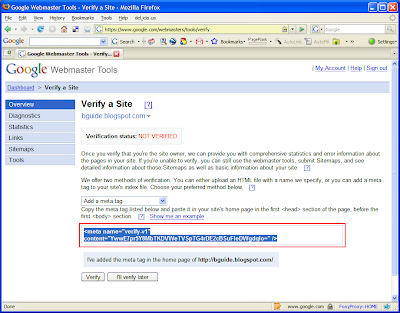
From the Verify a Site page, select Add a meta tag as the verification method.


You will then be presented with a meta tag. Copy the whole tag.


Go to your blog's Layout Editor and open the Edit HTML mode. Paste the meta tag you just copied immediately under the <head> tag. Save the template and go back to GWT.


Click on the Verify button.


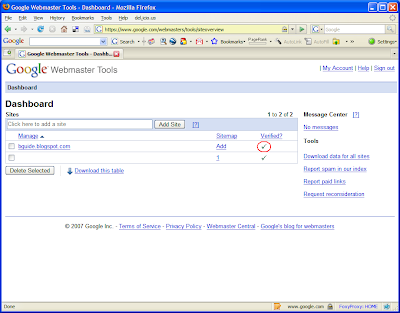
Go back to your dashboard and check whether the verification step is complete. (It might take a few minutes to get your status updated).


That's it. You have now added and verified your blog to GWT. Next step would be to submit a Sitemap to Google Webmaster Tools for Googlebot to start crawling your site.